Step 1
Create a new document in Photoshop (Ctrl + N) size 1024x768 pixels. Set the foreground color to #464646
, background on #363636
and select a tool Gradient Tool (G). In settings select Radial gradient. Make a fill from the center of the canvas to one of the corners.
Paste a metal sheet to our document and set to Overlay, lower Opacity layer up to 70%.
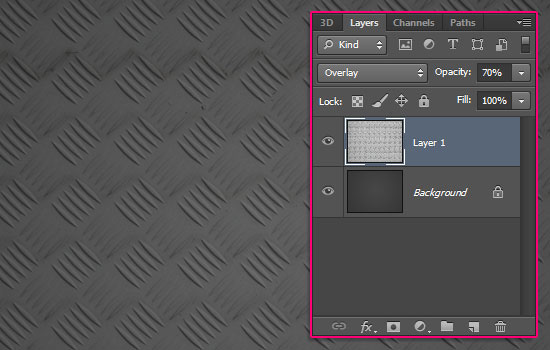
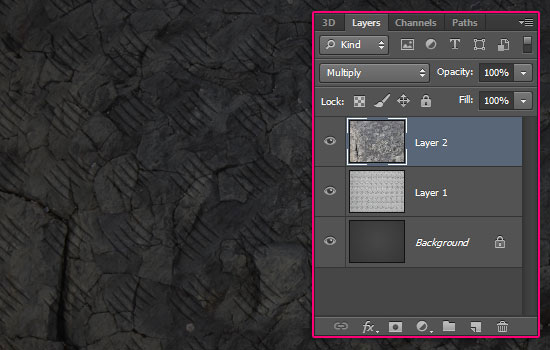
Paste the cracked texture on top of the two layers and change Blending Mode on Multiplication.
Step 2
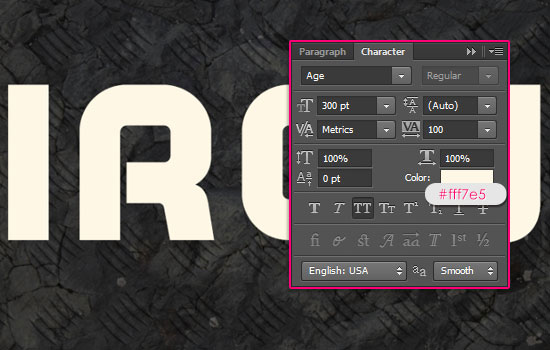
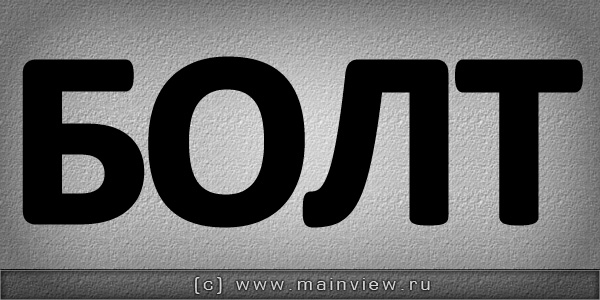
Upload the "Age" font to the shared library, select the tool Horizontal Type Tool (T), open the font settings window (Window – Character) and enter the values shown in the following screenshot. Then write the word "IRON".
You can also install the font via context menu font file.
Install Fill layer to 0%.

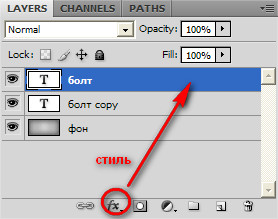
Double click on the text layer to open the styles window, apply the style Stroke.
Size: 25 pixels
Position: Center
Blend Mode: Normal
Stroke Type: Color
Color: Black

To prevent the letters from connecting after tracing, you need to set a high value Tracking in the font settings.

Step 3
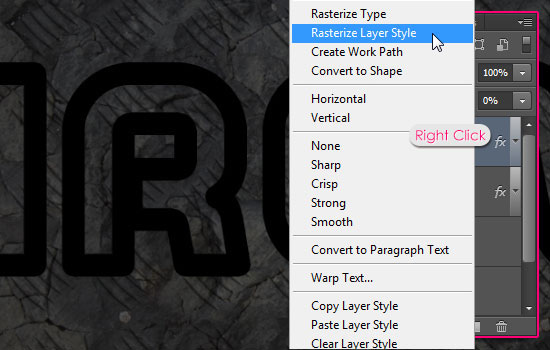
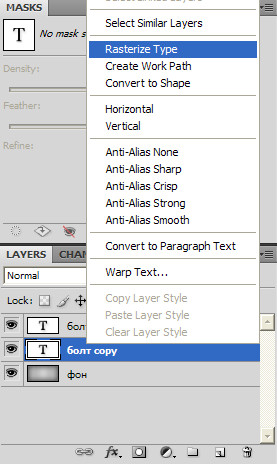
Create a copy of the text layer (Ctrl + J) and hide the original by clicking on the eye icon.

Now we will rasterize the copy of the text layer and its styles. In the new version CS6 It became possible to rasterize layer styles. Right-click on the layer and select Rasterize Layer Style. If you have an earlier version of Photoshop, then place the layer in the group (Ctrl + G), right-click on the group and select Merge Group.
Create a copy of the rasterized layer (Ctrl + J).

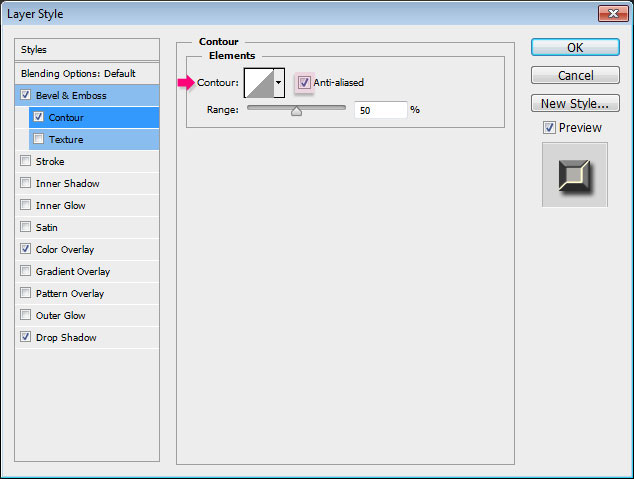
Step 4
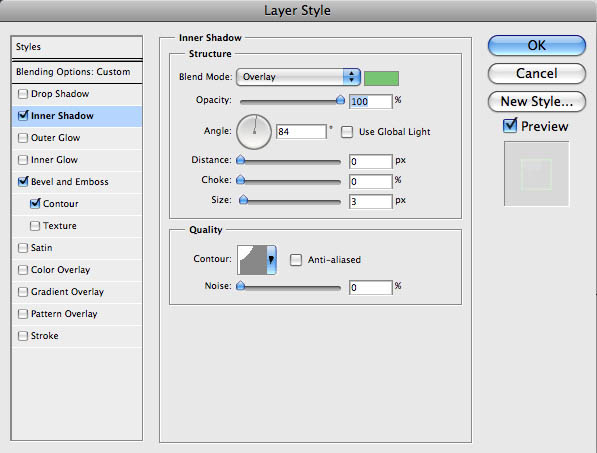
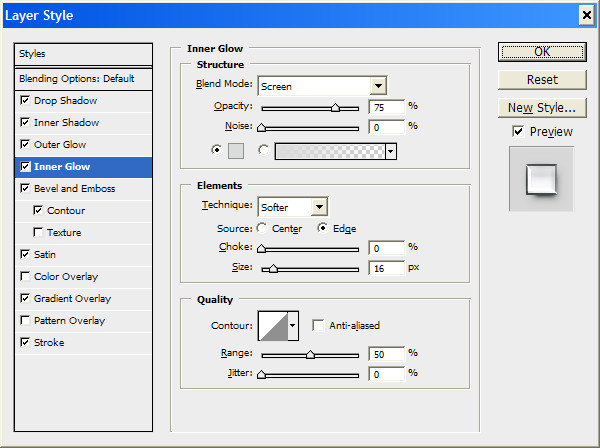
Go to the second copy's styles menu (double-click on the layer) and apply the following styles:
Embossing (Bevel & Emboss):
Style: Inner Bevel
Technique: Chisel Soft
Depth: 100%
Direction: Up
Size: 7 pixels
Soften: 0 pixels
Angle: 120
Use Global Light: Enabled
Altitude: 30
Gloss Contour: Ring; Anti-aliased: Enabled
Highlight Mode: Vivid Light; Color: #ffe9ac; Opacity: 75%
Shadow Mode: Multiply; Color: Black; Opacity: 75%.

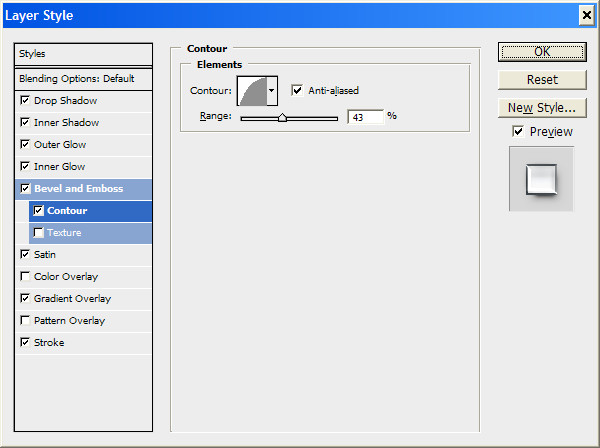
Contour:
Contour: Linear, Anti-aliased: Enabled
Range: 50%
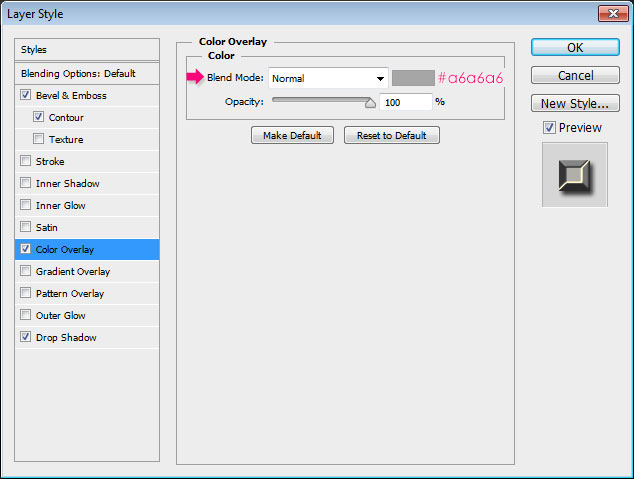
Color Overlay:
Blend Mode: Normal; Color: #a6a6a6
Opacity: 100%
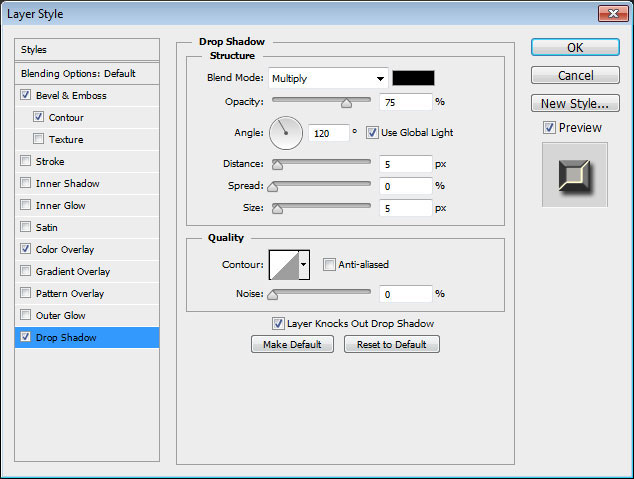
Drop Shadow:
Blend Mode: Multiply; Color: Black
Angle: 120; Use Global Light: Enabled
Distance: 5 pixels
Spread: 0%
Size: 5 pixels
Noise: 0%
Layer Knocks Out Drop Shadow: Enabled
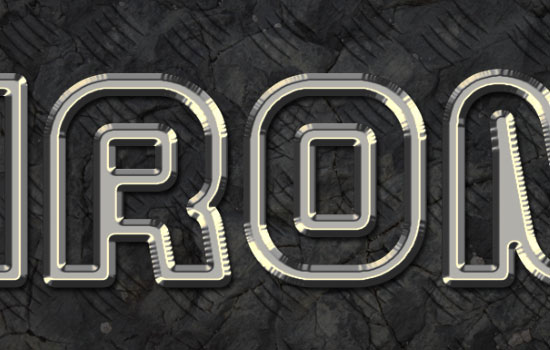
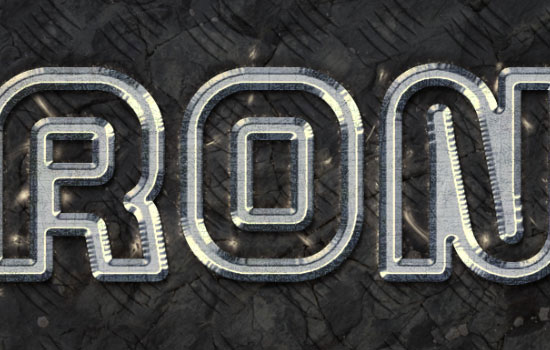
Result after applying styles:
Step 5
Paste the metal texture with scratches into our document on top of the other layers. Then make a selection of the rasterized text layer (holding Ctrl, click on the layer thumbnail).

While on the texture layer, click Ctrl+J to copy the selected part to a separate layer. The original texture layer can be removed.
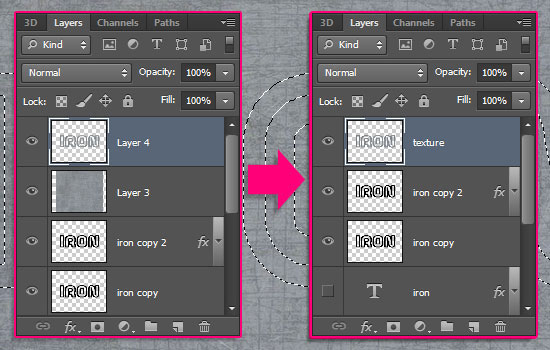
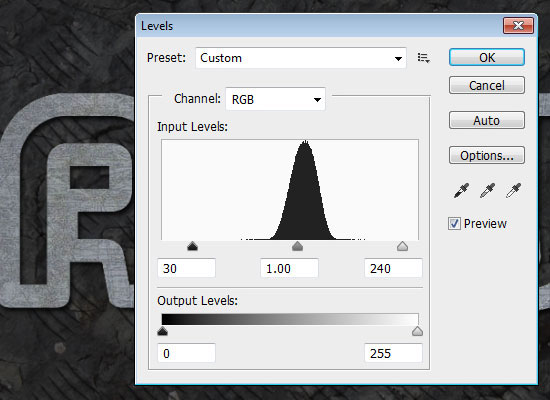
While on the layer with the copied texture, go to the adjustments Levels (Image – Adjustments – Levels). Enter the following values: 30 / 1.00 / 240.
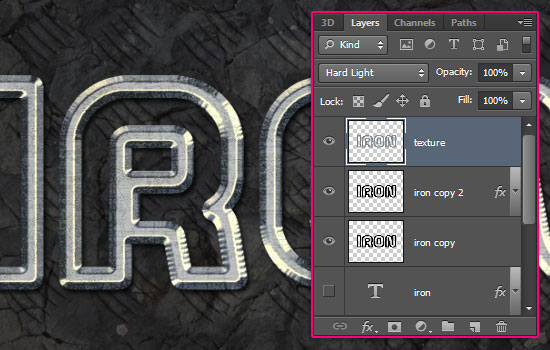
Install Blending Mode layer with letter texture on Hard Light.
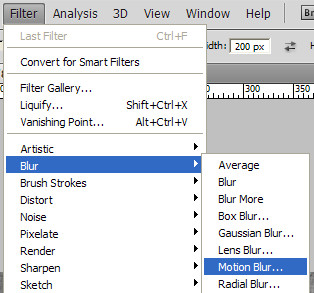
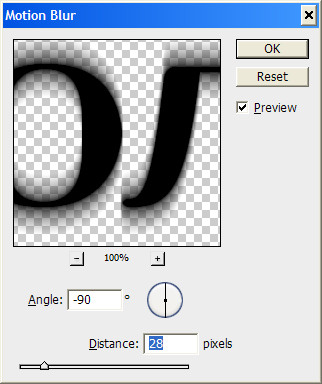
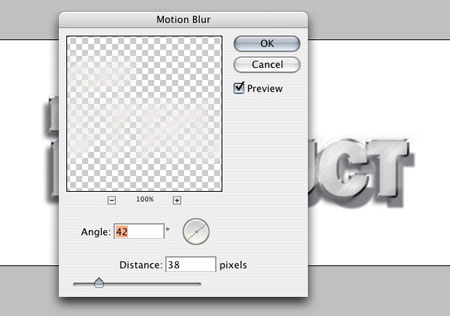
Select the first rasterized text layer. Apply a filter to it Motion blur (Filter – Blur – Motion Blur) (Filter – Blur – Motion Blur):
Angle: 90 degrees
Distance: 30 pixels
The shadow will become a little thicker, adding depth to the text.

Step 6
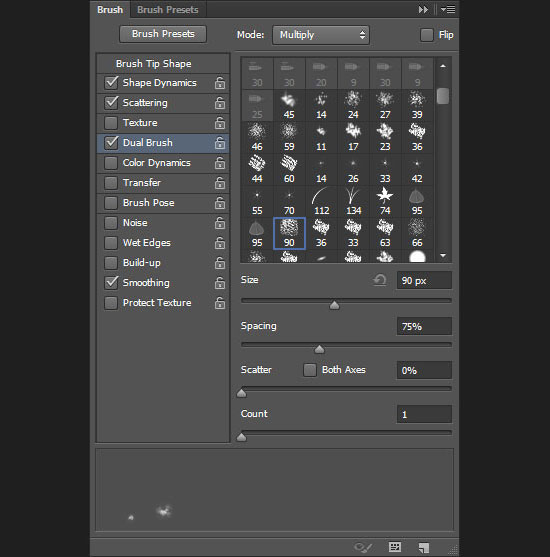
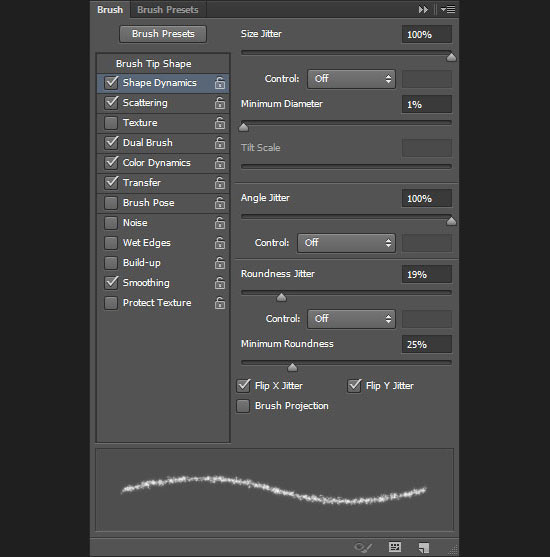
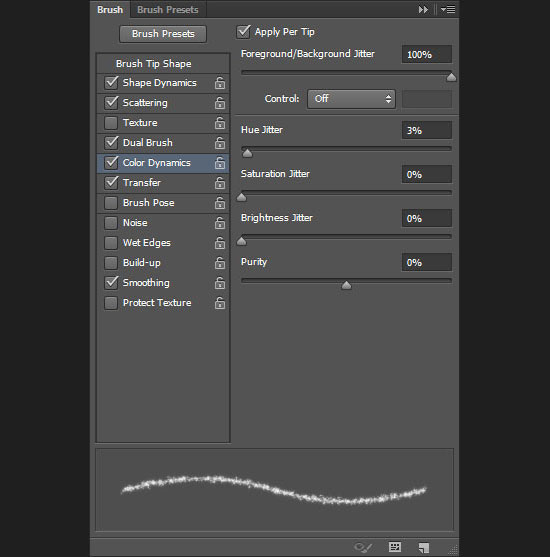
Select a tool Brush Tool (B) and go to the brushes palette (Window – Brushes) (Window – Brushes). Set up your brush as shown below.


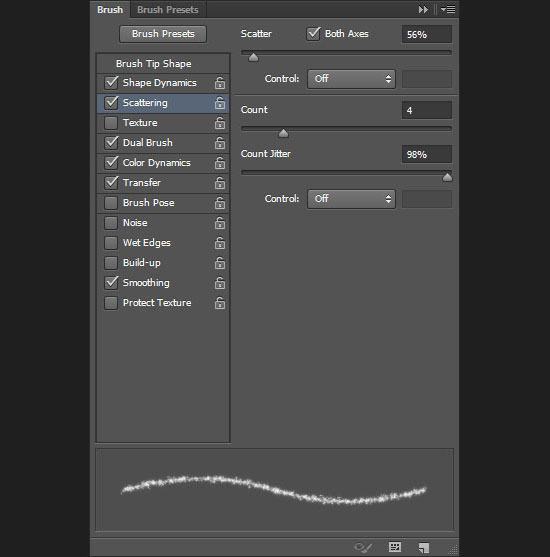
Scattering:

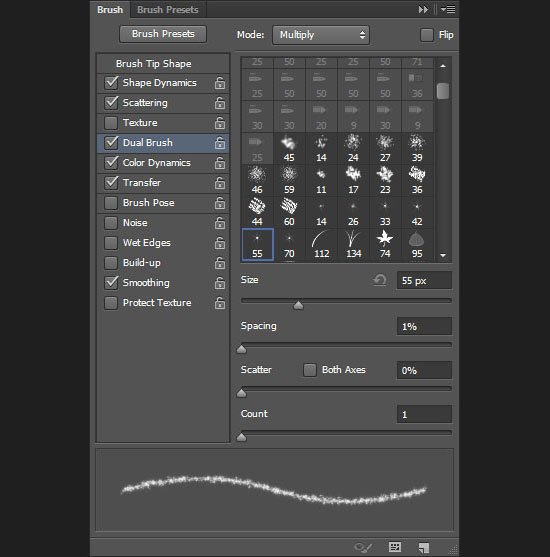
Dual Brush: Select the “90 px Sampled Tip” brush.
Step 7
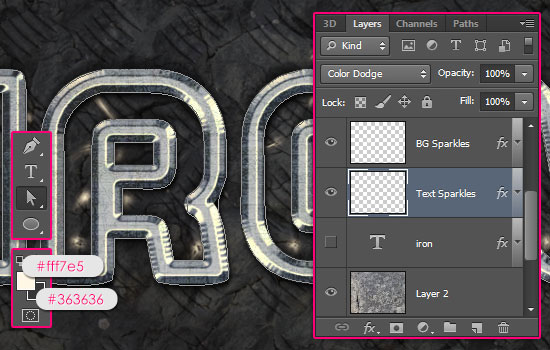
Right-click on the original text layer and select Create Work Path.
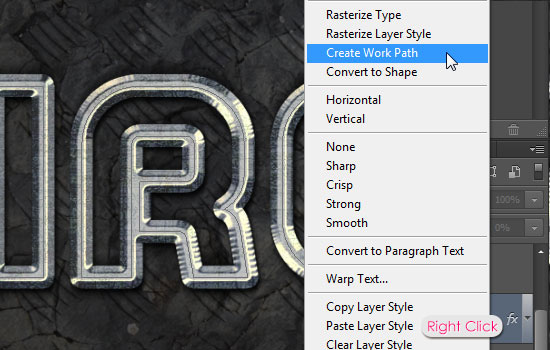
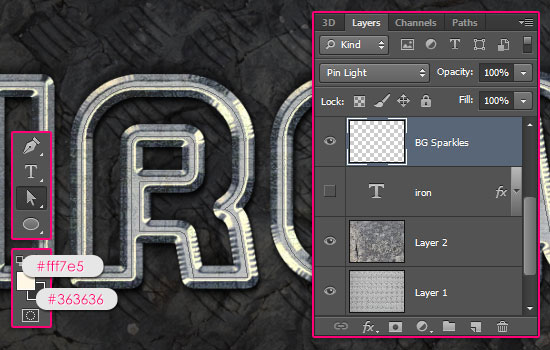
Create a new layer directly above the original one, but below the two rasterized ones. Call it "BG Sparkles". Install Blending Mode this layer on Pin Light. Select tool, set fill color to #fff7e5, background color - #363636 .
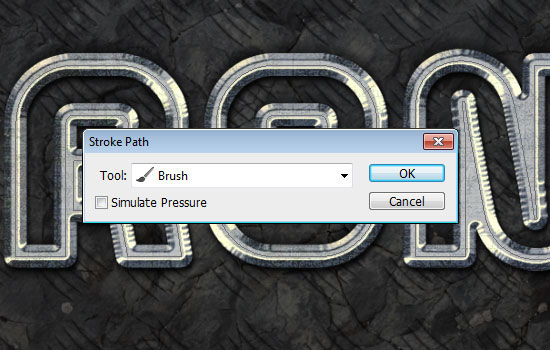
Right-click on the outline and select Stroke Path.
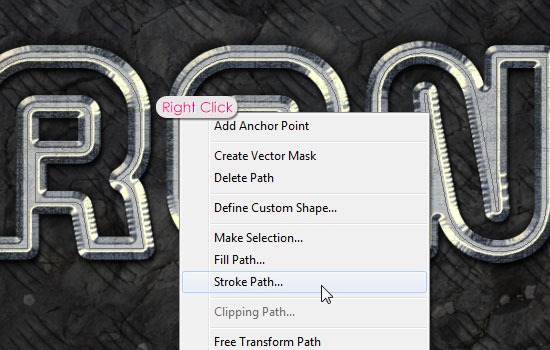
In the window that appears, select Brush and make sure the function Simulate Pressure inactive.
The outline will be outlined with the previously configured brush. Click Enter to remove the outline.

Step 8
Double click on the "BG Sparkles" layer to open the Styles window. Apply style Outer Glow with the following parameters:
Blend Mode: Overlay
Opacity: 75%
Noise: 0%
Color: #ffd3be
Technique: Softer
Spread: 0%
Size: 10 pixels
Contour: Linear; Anti-aliased: Disabled
Range: 50%
Jitter: 0%

Result:

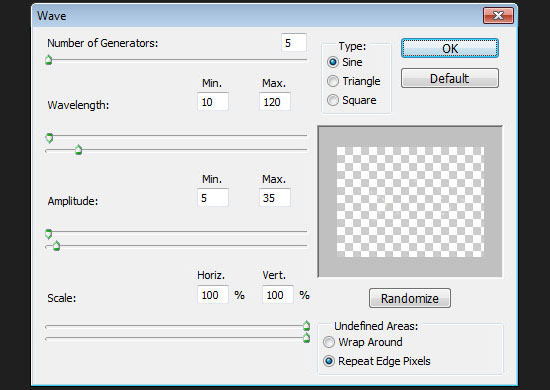
Apply a filter to the same layer Wave (Filter – Distort – Wave).
Step 9
Open the Brush Palette again (F5) and select the “star 14” brush. Set it up like this:
Brush Tip Shape:

Shape Dynamics:
Scattering:
Dual Brush: Select the "Star 55px" brush.
Color Dynamics:
Transfer:

Step 10
Make a selection of one of the rasterized text layers.

Go to the Paths Palette (Window – Paths). Holding Alt, click on the icon for creating an outline from a selection. In the window that appears, enter a value of 1 pixel. The lower this value, the better the outline will be.

An outline will appear on the canvas around the letters.

Create a new layer (Ctrl + Shift + N) under the "BG Sparkles" layer and name it "Text Sparkles". Right-click on the "BG Sparkles" layer and select Copy Layer Style. Then right-click on the “Text Sparkles” layer and select Paste Layer Style. Install Blending Mode layer "Text Sparkles" on Lightening the base (Color Dodge). The foreground and background colors should still be #fff7e5 And #363636 . Select a tool Arrow (Direct Selection Tool) (A).
Trace the outline in the same way as we did earlier. Don't forget to press Enter after tracing to remove the outline. The stroke will not be very bright, but this will be corrected later when we add adjustment layers.
Step 11
Paste one of the sparkler images into our document on top of all layers. There is a very simple and quick way to hide a black background. Install Blending Mode on Replacement with light (Lighten). The black color will be hidden because the background is too dark and the sparkles are bright. Tool Free Transform (Ctrl + T) change the size of the sparks and rotate them at the desired angle so that you can place them on the letters.
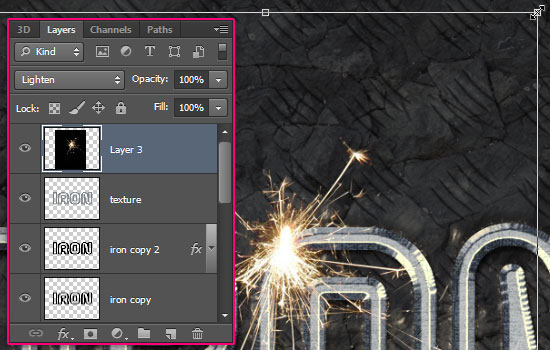
Do the same for the other sparkles images.
To change the color of the sparks, use the correction Hue/Saturation (Image – Adjustments – Hue/Saturation).
Step 12
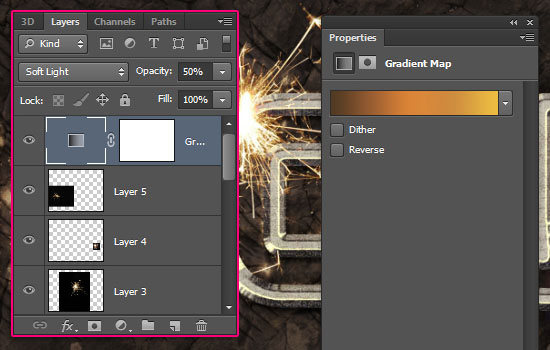
Click on the black and white circle icon at the bottom of the layers palette and select Gradient Map. This way you can quickly create adjustment layers.

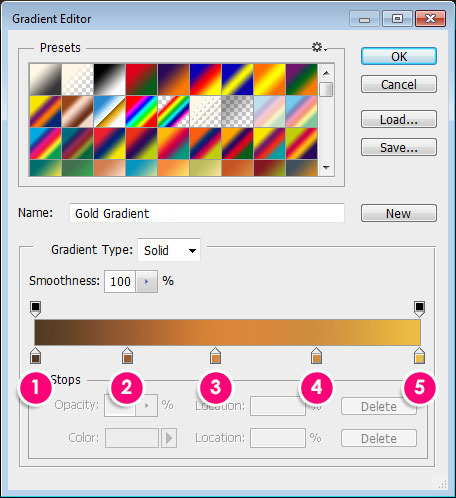
This adjustment layer should be on top of the others. Install it Blending Mode on Soft Light and lower Opacity up to 50%. Open the window Correction (Window – Corrections) and change the gradient.
Below are the marks and their color code:
Number – Color code – Position
1 – #503a23 – 0
2 – #985d31 – 24
3 – #da8437 – 47
4 –#cf8d3f – 73
5 – #edbd41 – 100
Create another adjustment layer - Photo Filter.

Filter: Warming Filter (85)
Density: 25%
Preserve Luminosity: Enabled
This adjustment layer will make the entire illustration brighter.

Step 13
Create a new layer between the two background textures. Name it "Corners".

Tool Oval area (Elliptical Marquee Tool) (M) and create an oval selection as shown below.
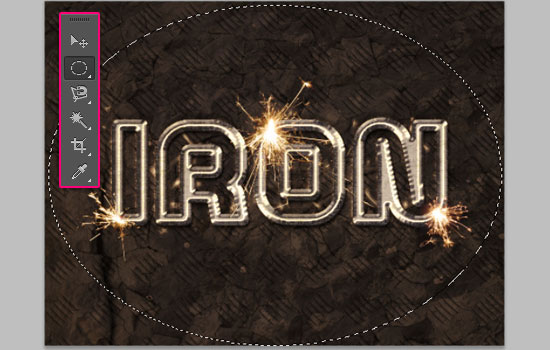
Go to menu Selection – Modify – Feather (Select – Modify – Feather) and enter a value of 50 pixels. The edges of the selection will become softer.
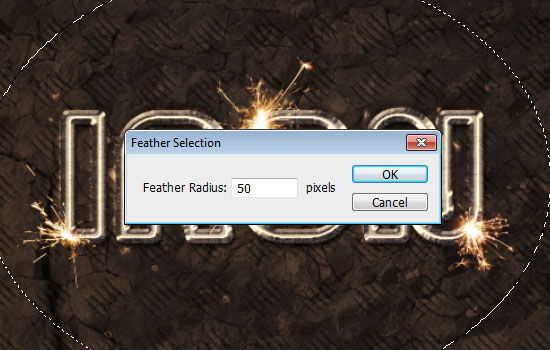
Invert selection (Select – Inverse).
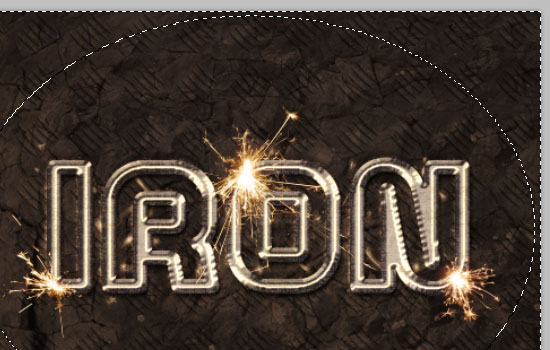
Fill the selection with black.
Remove selection (Ctrl + D). Dark corners will enhance the effect of depth.
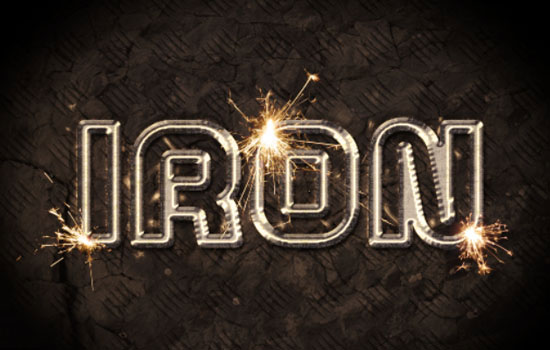
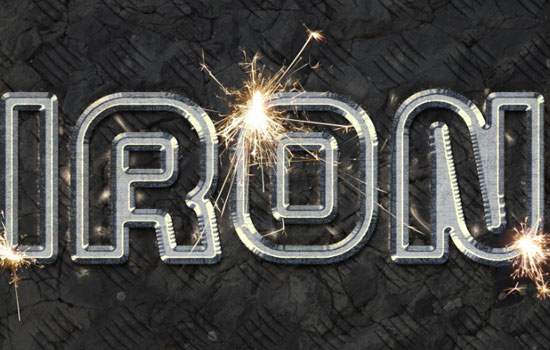
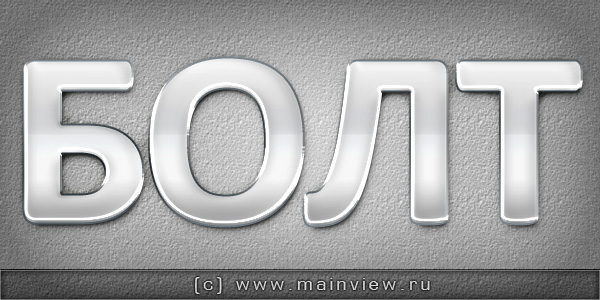
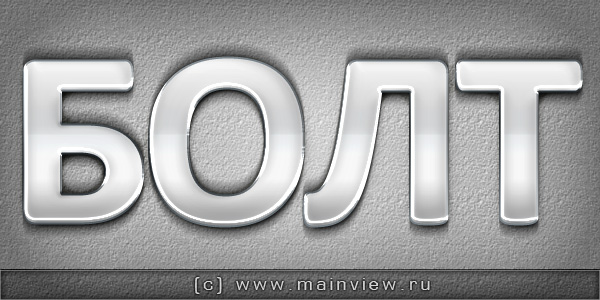
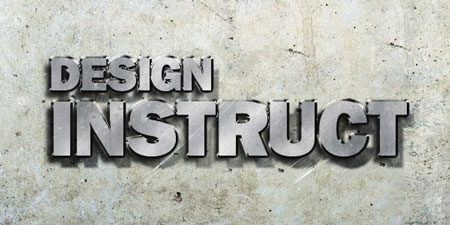
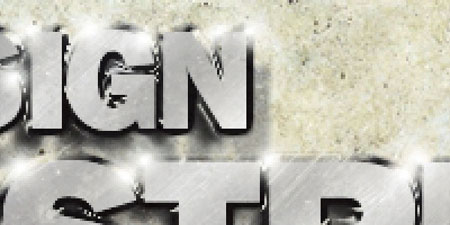
Final result:
Click on the image to enlarge.
Collis (Translation: Nadik)
Quick Gold Text.
There are many ways to make "golden text". This text uses two layer styles applied to the same word, only the bottom layer is slightly offset a few pixels down.
Here I used the font Trajan.

The top layer is created using bevel, gradient overlay, etc. (parameters on the screenshot). A small shadow was also added in order to shade this layer from the bottom one.

![]()
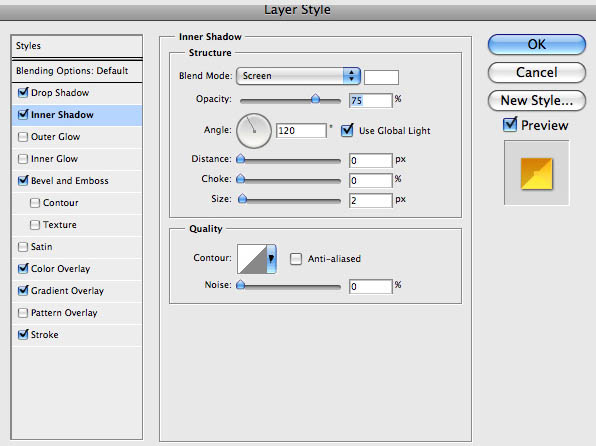


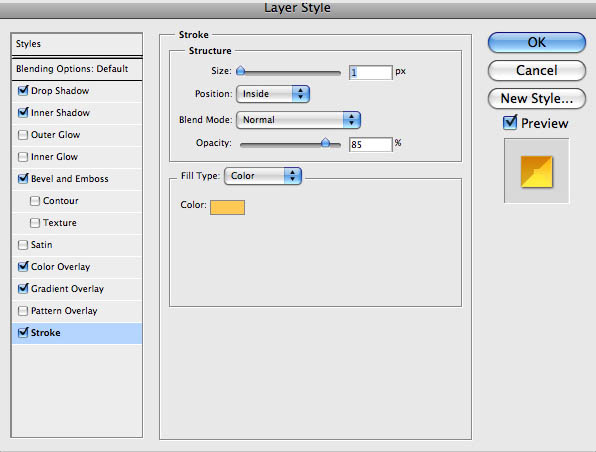

The bottom layer gives volume to our letters. notice, that inner part V this moment important because it will be covered by the top gold layer.


Metallic 3d text/3d Metallic Text
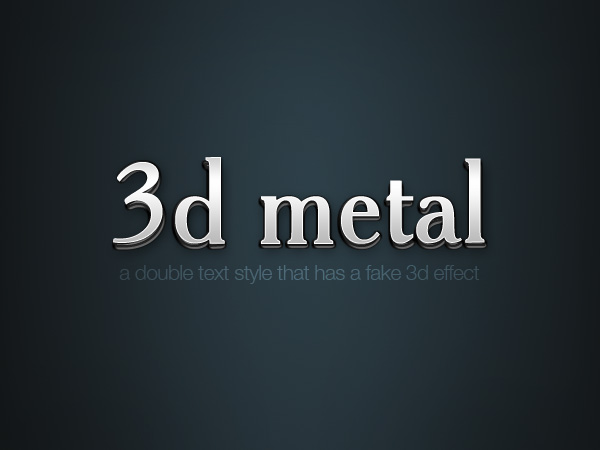
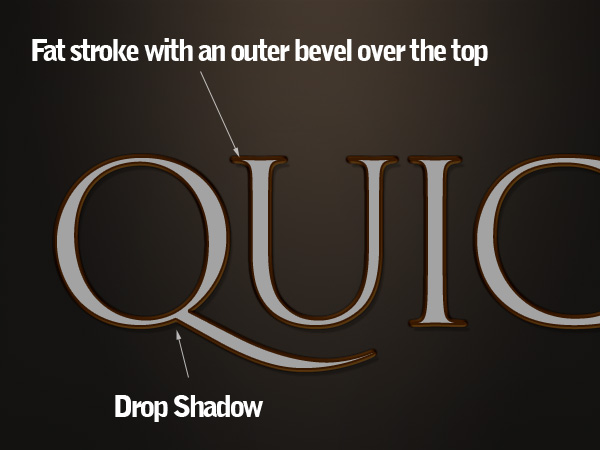
This effect is just a variation. As you can see below, we again used two layers with the same text, each with a different set of effects applied.
Here I used the effect Gloss Contour on the applied bevel&emboss style. Throughout we used shades of yellow to create shadows, in this case it was gray.

Experiments with text:
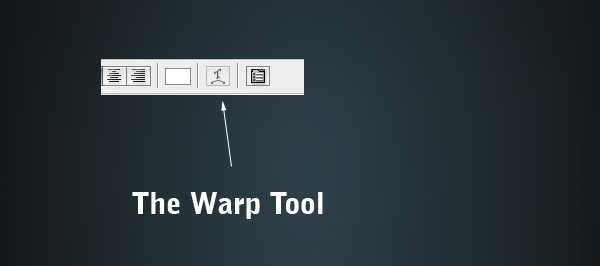
I also tried applying curvature to the text. This can be done by clicking on the text layer, selecting the tool Horizontal Type Tool(T), and then clicking on the icon shown in the screenshot. In the drop-down dialog box, select Warp.
If you apply the effect Bulge to one of the layers, you will get a slight distortion that looks sloppy.

Double text/DoubleType
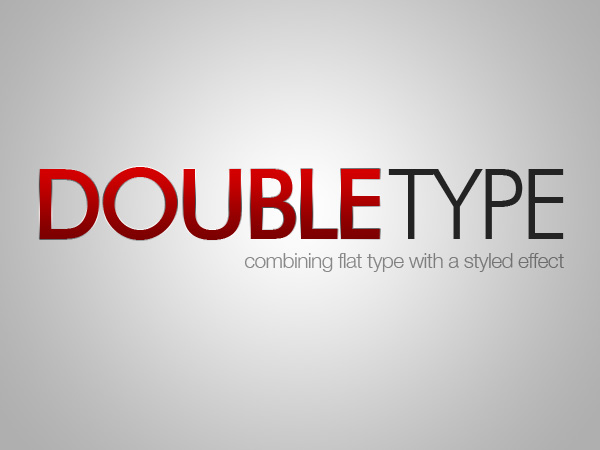
This effect is very simple and is based only on the fact that styles are applied to one part of the text and not to another.
Here I used the font Futura.
I'm sure you've seen this effect on movie posters. I used red, but you can use any combination of colors.
To make a text effect like this, we will only use styles - Outer Stroke And Gradient Overlay:
1. So, add an Outer Stroke of 1px Outer Stroke and use a gradient instead of a color. I used one of Photoshop's ready-made metallic gradients (see settings for the "thin metal" effect below). This will add some shine to the edges of the text.
2. Then add a black and white gradient (Gradient Overlay), change the blending mode to Overlay and reduce the transparency to 50%. And now, when you change the text color, it will be adjusted automatically.

HyperColor
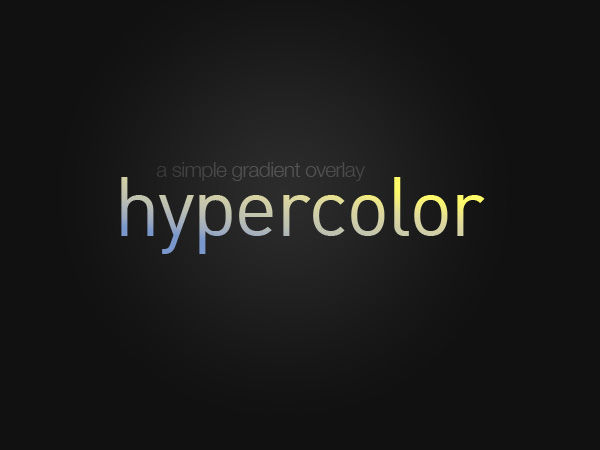
I found this effect on the Chris Garrett Media website. It's really a very simple effect. Type any text (for example, in font DIN), add Gradient Overlay. Photoshop has a set of very beautiful Color Harmony gradients that you can add and use by clicking the little arrow on the right in the dialog Gradient Editor. Apply one of these gradients on white text and reduce the opacity to 59% (the background should be dark).
![]()
Thin Metal
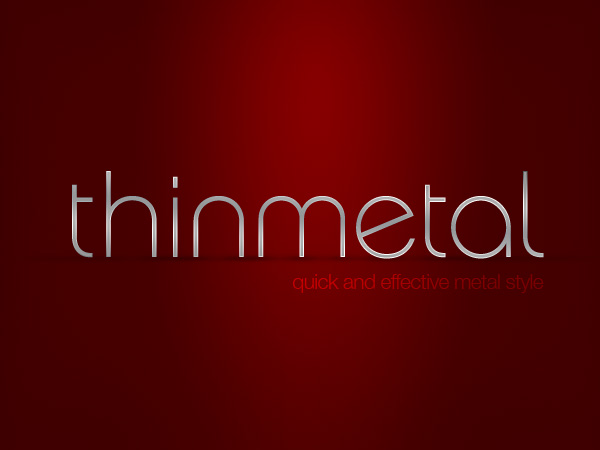
This is the easiest way to make metal text. It is based on the fact that when we see metal in real life, it usually has a lot of highlights and shadows, especially shiny chrome metal. So, by using two copies of the same gradient at different angles, you can easily create a metallic text effect.
This effect works best with thin fonts, otherwise the text will look boring and flat (unless we add more styles, but then it won't be that super fast!)
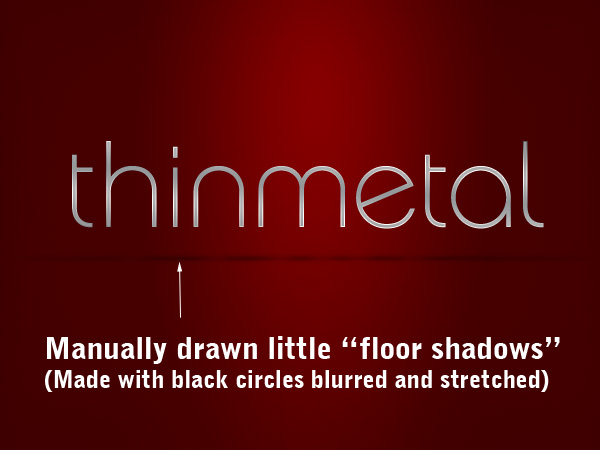
So, firstly, I decided to make the text "stand on the surface". Now create a new layer and draw small circles under the stem of each letter, then apply a filter Filters > Blur > Gaussian Blur= 2 px. Now click CTRL+T and flatten the circles. Reduce the transparency to 30%.
For shadows of letters such as "a" and "e", use transform tool and stretch the circles horizontally.
At the end, I duplicated one of the shadow circles and stretched it along the entire word, so that this shadow passed under the entire text.
Experiment and you will get very realistic shadows under the text.

So our text is a combination of two styles - Gradient Overlay and Stroke = 1px using the same gradient. The gradient we used (the same as in the Double Type effect earlier) is a standard metallic gradient in FS. You can add it by clicking the small arrow on the right in the Gradient Editor dialog and selecting Metals.
The whole secret of this effect is that the angles of the gradient and stroke should be different. This creates beautiful highlights on the text.
I also reduced the opacity of the main gradient to 14% for a smoother transition, but this step is optional.

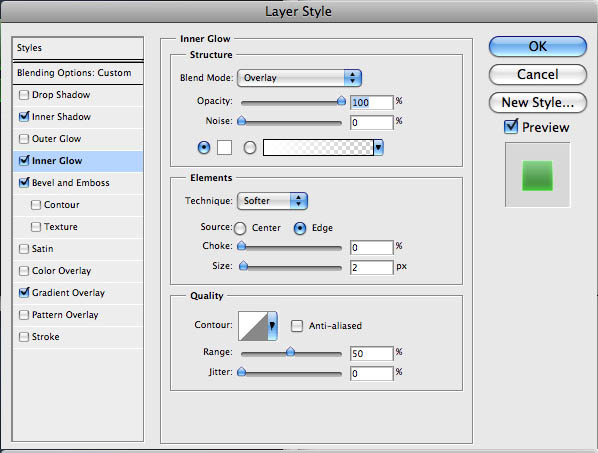
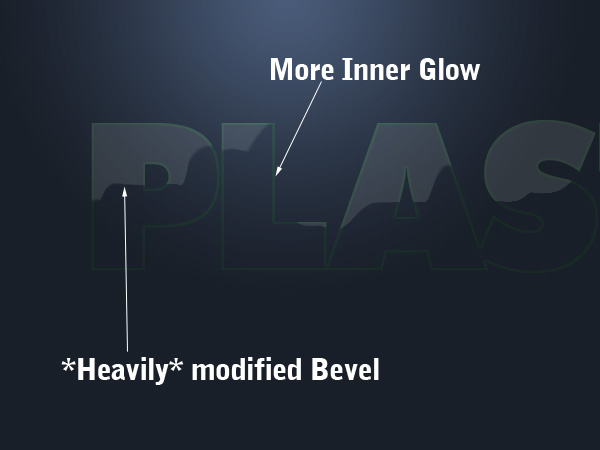
Fantastic plastic
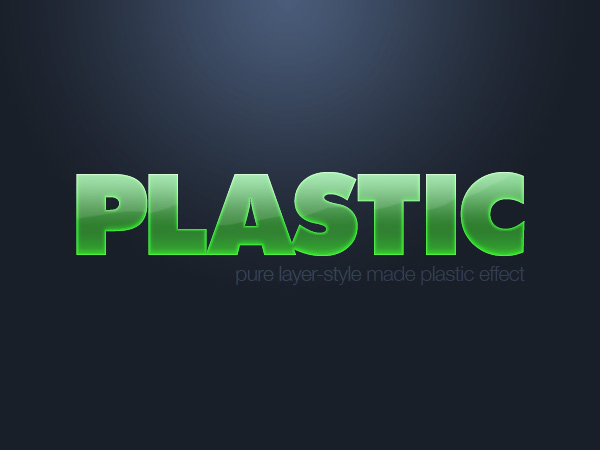
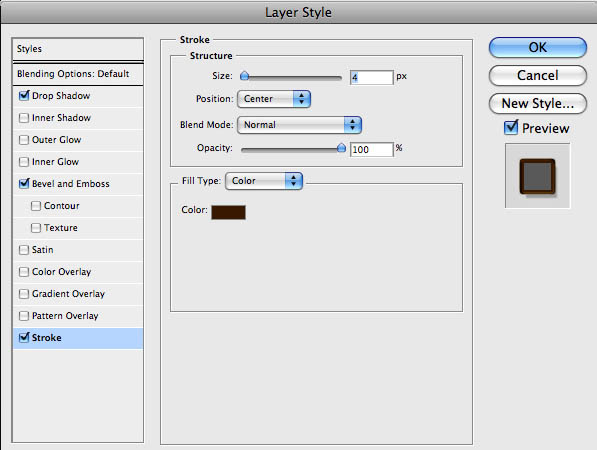
I really love creating gel text styles, although I hardly use them in real projects. this effect was also created on two identical text layers with different styles layer (like the metal ones we discussed above). You can see these two layers below. The main modeling of the effect was carried out on the bottom layer. the top layer was used to create a glitter effect.
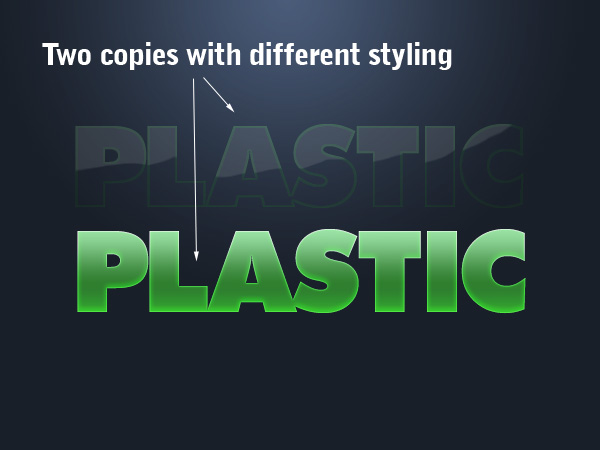
In the bottom layer we used outer and inner glow, gradient and shadows. The settings are given below.

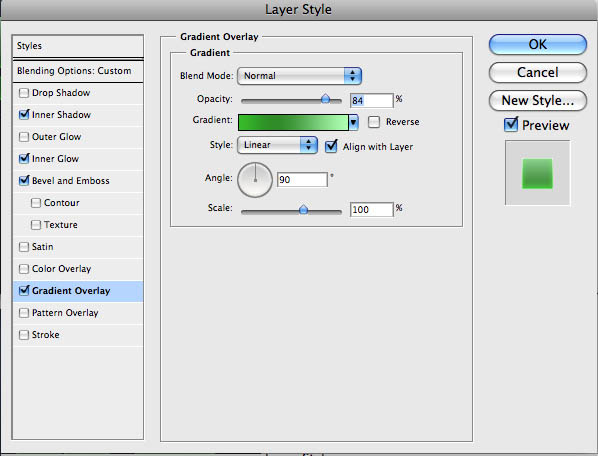

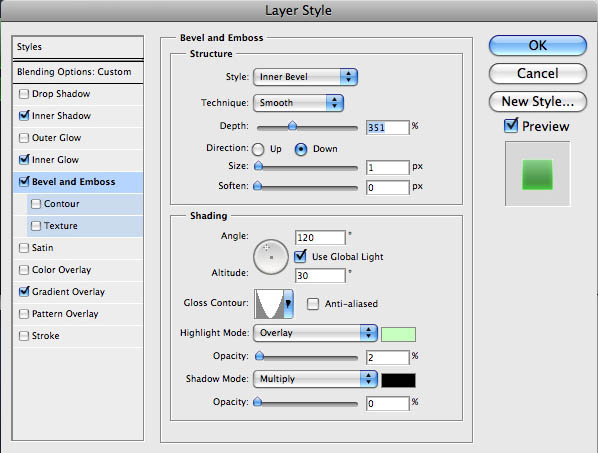
Top layer changed layer style Bevel & Emboss. Below you can see the settings, including those for the gradient outline.


Reading time: 5 minutes Images: 19
Dear friends, today we are watching a new Photoshop lesson. I called this lesson . Today's lesson, like the previous ones, is very simple. To get a similar effect, we only use styles for text. I really love experimenting with styles. This is a very powerful tool with which you can achieve amazing results. Sometimes the result is amazing, but the effects are minimal. Styles give great freedom to creativity. In this lesson we will also use the blur tool, but we will try to achieve the main effect only with styles. So let's see.
First, as always, we will select a suitable background on which the effect will look much better than on a white or black background.
The right background allows the effect to appear quite realistic. Because today we want to get Polished Metal Text Effect in Photoshop, then, accordingly, we use any suitable texture. I chose concrete. Maybe because it's light. So, let's create a new document ( Ctrl+N) and opening the photo with our texture, drag it onto a new layer of our document. When you drag a photo, it will automatically be inserted into a new layer.
Now, by selecting the text tool ( T) and by clicking in the center of the work area, write the text we need.
Now it’s tedious to make a double of this sly from the lyrics. To do this, click the left mouse button, and while holding the key, drag this layer according to the following image:
We get a new layer completely identical to the original. And holding it, we lower it down.
Well, half the job is done. It is advisable to choose a bolder font for this lesson. Now we assign a new style to the layer with our text (top layer).


Click on the OK button and look at the result.
It's a little lacking in realism. What's missing? That's right, shadows. Let's add a shadow. For this, you just need a duplicate text layer. Select the duplicated layer, below the main one, and with the right mouse button select Rasterize Type.
Now select the layer blur.
Press the button OK and enjoy the result. If you did everything correctly, then you should get the following result, which I called Polished Metal Text Effect in Photoshop.
That's our Photoshop lesson finished, thanks for your attention!
Sometimes, you need to quickly apply some effect and this is where actions come to the rescue. With one click of a button, you can easily recreate the desired effect.
In this tutorial we will create a metallic text effect while recording an action for it. At the end of the lesson, you will be able to reproduce this effect by simply clicking on the Play button in the Operations palette.
Final image:
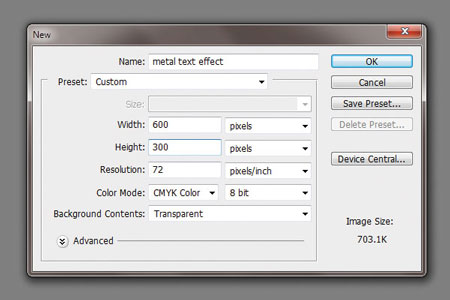
Step 1
Create a new document (File - New) (File > New) ( Ctr + N) size 600x300 pixels with a resolution of 72 pixels/inch.
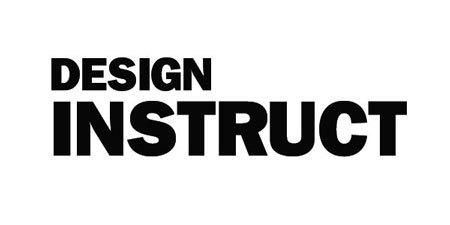
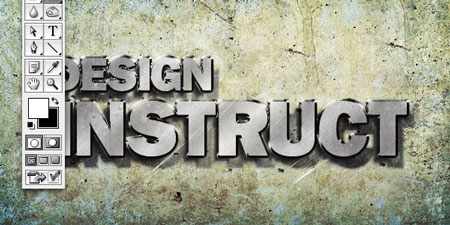
Tool Text(Horizontal Type Tool) ( T) and write the text “Design Instruct”. In my case, the font Franklin Gothic Heavy was used, but you can choose a different one. The main thing is that the font style is bold.
Step 2
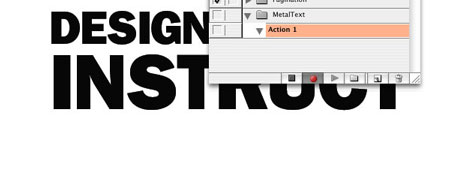
Before we continue, we need to create a new action that will record all our actions in this tutorial. Open Operations palette(Window > Actions) ( Alt+F9), click on the folder icon at the bottom of the palette (Create new set) and name this group “Metal Text”. Now click on the icon creating a new action(Create new action):
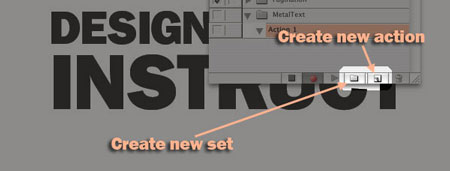
Once a new action is created, recording should start automatically (You will see a red circle at the bottom of the Actions palette indicating that recording has started).
Step 3
Go to the menu (Select > Load Selection) and then create a new layer ( Shift + Ctrl + N). Fill the new layer with white (#FFFFFF) and make the original text layer invisible.
Duplicate the new text (Layer - Duplicate Layer) and move it under the top text layer.
We need to create two lights, and this text layer will contain the first light. Add a Layer Style Shadow(Layer - Layer Styles - Shadow) (Layer> Layer Style> Drop Shadow). Set the settings as in the screenshot and turn off the Use Global Light checkbox. This option sets the shadow and emboss to the same angle, but we need two different sources.
Note: Both light sources should be above the original text layer.
Step 4
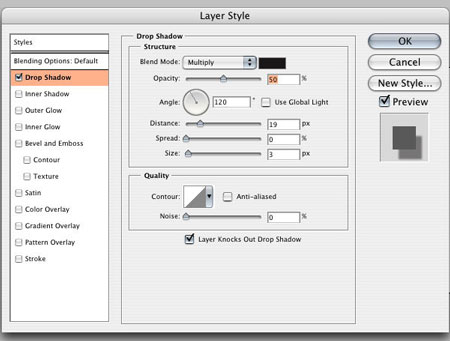
Apply a layer style to the top text layer Shadow(Layer - Layer Styles - Shadow) (Layer> Layer Style> Drop Shadow):

Step 5
Now let's add embossing to create a metallic effect. Layer - Layer Styles - Emboss(Layer > Layer Style > Bevel and Emboss).

Step 6
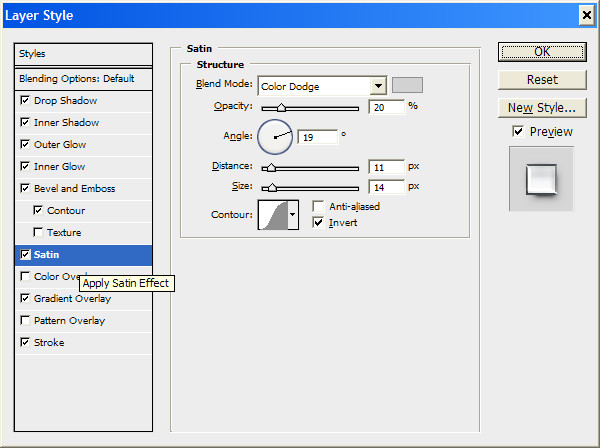
Now let's add a layer style Gloss(Layer - Layer Styles - Gloss) (Layer> Layer Style> Satin):
![]()
Step 7
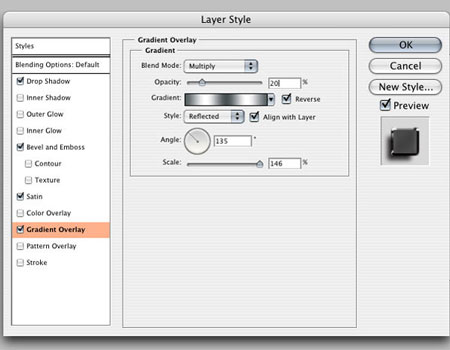
The last layer style, Gradient overlay, will darken the text and help add a light reflection (Layer - Layer Styles - Gradient Overlay) (Layer > Layer Style > Gradient Overlay).
Step 8
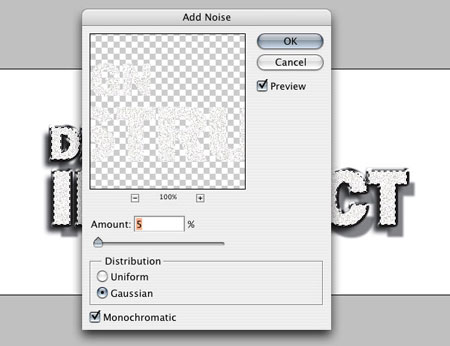
We need to add a metallic texture to the text. With the top layer active, enter the menu Load Selection(Selection - Load selected area) (Select > Load Selection).
Create a new layer(Layer - New - Layer) (Layer> New Layer) ( Shift +Ctrl +N) and fill the selection with white. Now apply it to it filter Noise(Filter - Noise - Add Noise) (Filter > Noise > Add Noise).
Step 9
Deselect (Select - Deselect) (Select > Deselect) ( Ctrl+D) and apply the Motion Blur filter (Filter > Blur > Motion Blur).
Select the first text layer and load a selection area Selection - Load Selection(Select > Load Selection). Now invert the selection (Select > Inverse) ( Shift + Ctrl + I). Delete the selected area. This will get rid of the noise that was outside the text. Change the blending mode to Multiplication(Multiply).
The action is ready. Click the stop button at the bottom of the Actions palette.
Step 10
Open the wall texture, drag it into the image and place it below all layers.

Step 11
Let's add texture to the text. Open an image of an old film and transfer it to our document. Place the old film texture above all layers and reduce it to 30% ( Editing - Free Transform) (Edit > Free Transform) ( Ctrl+T) to fit the document size. Change the film texture blending mode to Overlay.
Step 12
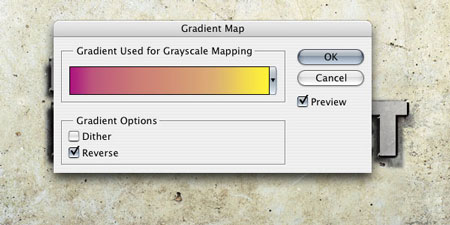
Now let's add a warm color tone to the image. Let's do this through an adjustment layer. Gradient map(Layer - New Adjustment Layer - Gradient Map) (Layer> New Adjustment Layer> Gradient Map). Create a gradient from yellow to magenta and enable the checkbox Inversion(reverse). Change the blending mode of this adjustment layer to Overlap(Overlay) and reduce the opacity to 30%.
Step 13
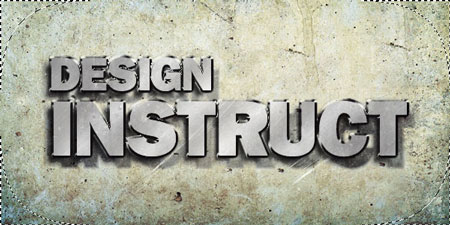
Now let's darken the edges of the image. Tool Rectangular areadischarge(Rectangular Marquee Tool) ( M) draw a selection and feather it by 50 pixels ( Shift+F6). Create a new layer (Layer - New Layer) (Layer> New Layer) ( Shift +Ctrl +N). Invert selection ( Selection - Inversion) (Select > Inverse) ( Shift + Ctrl + I) and fill the selection on a new layer with black. Change the blending mode of this layer to Color Burn.
Step 14
Using a tool Brush(Brush Tool) ( B) add a glow to the text. Set the brush size to 20 px and Hardness to 0%. Create a new layer ( Shift + Ctr + N) and place it under the film texture layer. Select the color white (#FFFFFF) and add light dots to the edges of the letters. Change the blending mode of this layer to Soft light(Soft Light).
Step 15
Merge image ( Layer - flatten) (Layer > Flatten Image). Duplicate the resulting layer (Layer - Create a duplicate) (Layer> Duplicate Layer). Apply a filter to the duplicate Colour contrast to sharpen the sharpness a little (Filter - Other - Color Contrast) (Filter > Other > High Pass). Set the radius to 10 px. Change the blending mode of this layer to Darkening the base(Color Burn) and reduce the opacity to 30%. Now merge both existing layers into one.

Step 16
Select a tool b(Quick Mask Mode) ( Q) :
Tool Gradient(Gradient Tool) ( G) radial type, draw a circle in the center of the document.
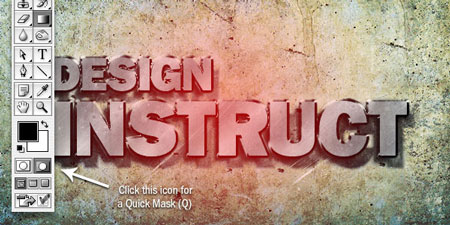
Exit mode Quick mask (Q) and invert the selection ( Selection - Inversion) (Select > Inverse) ( Shift + Ctrl + I).
Step 17
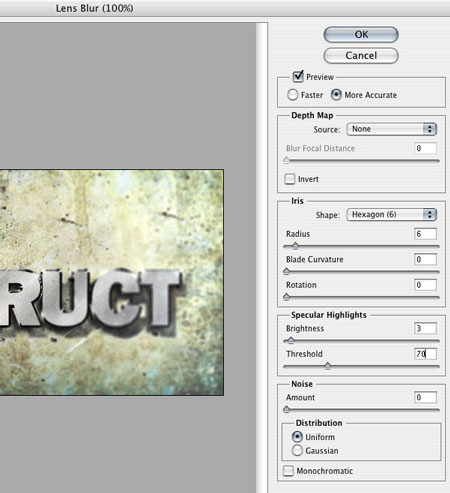
Finally, let's add a filter Shallow depth of field blur(Filter - Blur - Shallow depth of field blur) (Filter > Blur > Lens Blur):
In this tutorial you will learn how to create metallic text using chiaroscuro techniques. We will also use filters and actions.
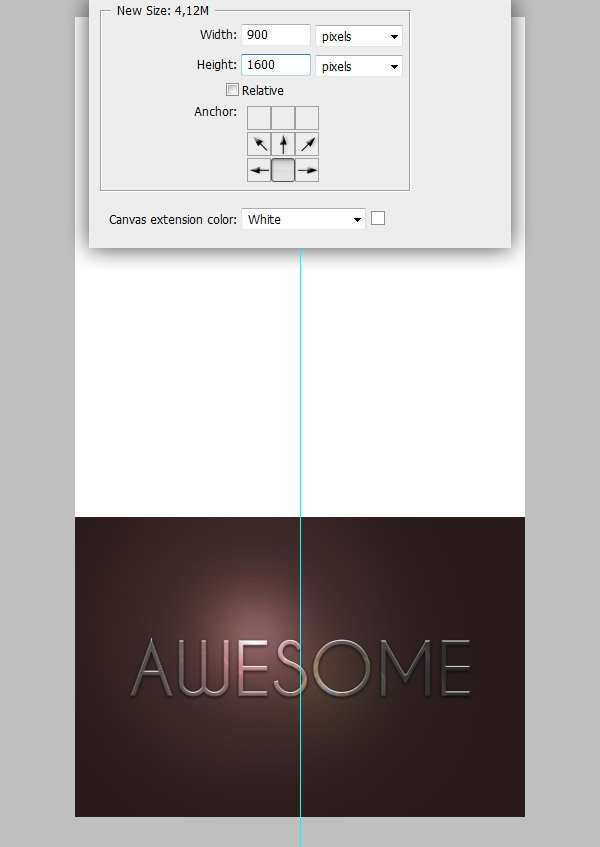
Step 1. Creating text Create a new document with dimensions of 900x600 pixels and a resolution of 300 pixels/inch. Fill the "Background" layer with #332222. Select white as your foreground color. Using the Type Tool, enter "AWESOME". Set the font to Caviar Dreams, set the font to Bold and set the font size to 36 pt.
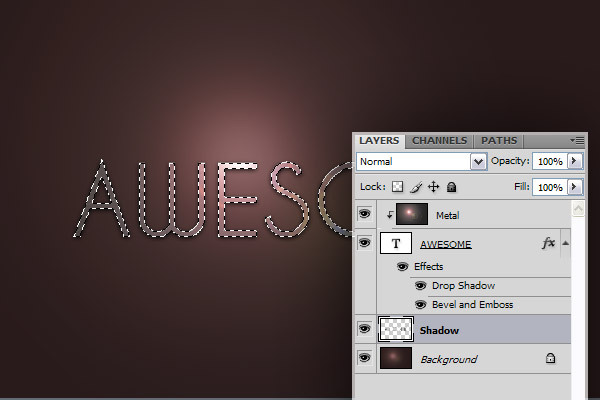
Step 2. Metal.
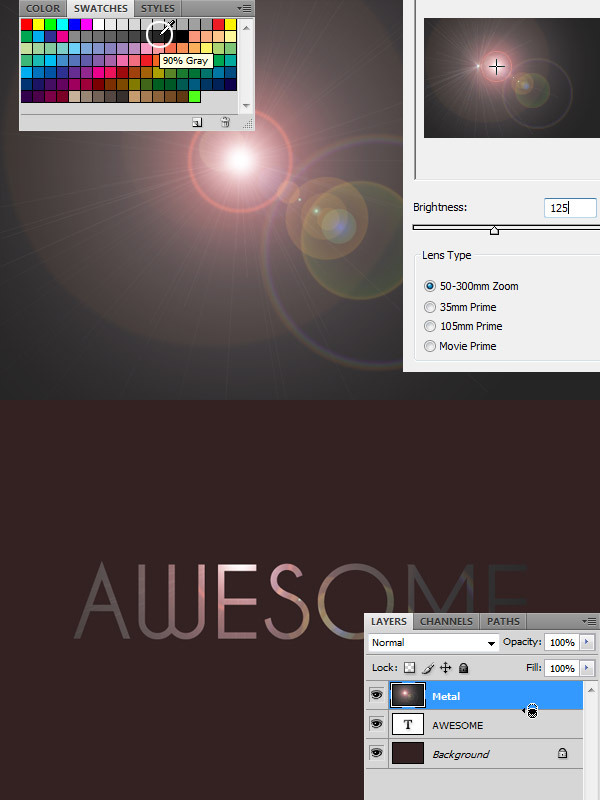
Create a new layer called "Metal" and fill it with 90% gray. Go to Filter > Render > Lens Flare and use the following settings: Brightness => 125, Lens Type => 50-300mm Zoom. Then go to the Layers palette and Alt-click on the line between "Awesome" and "Metal" to create a mask for the "Metal" layer.
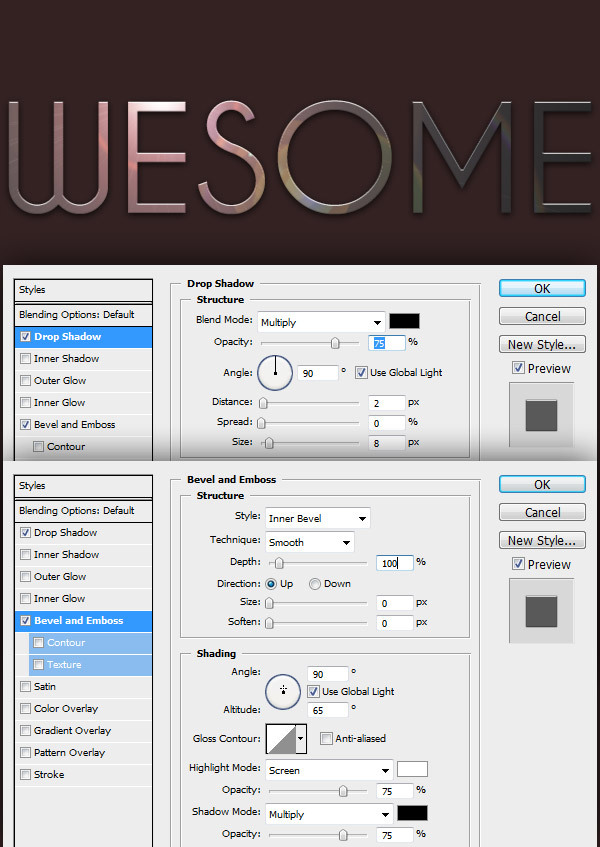
Step 3. Add styles.
Select "Awesome" in the layers palette and apply the Drop Shadow style with the following parameters: Blend Mode => Multiply, Opacity => 75%, Angle => 90, Distance => 2px, Size => 8px. Then add Bevel and Emboss with these settings: Style => Inner Bevel, Depth => 100%, Direction => Up, Size => 0, Angle => 90, Altitude => 65.
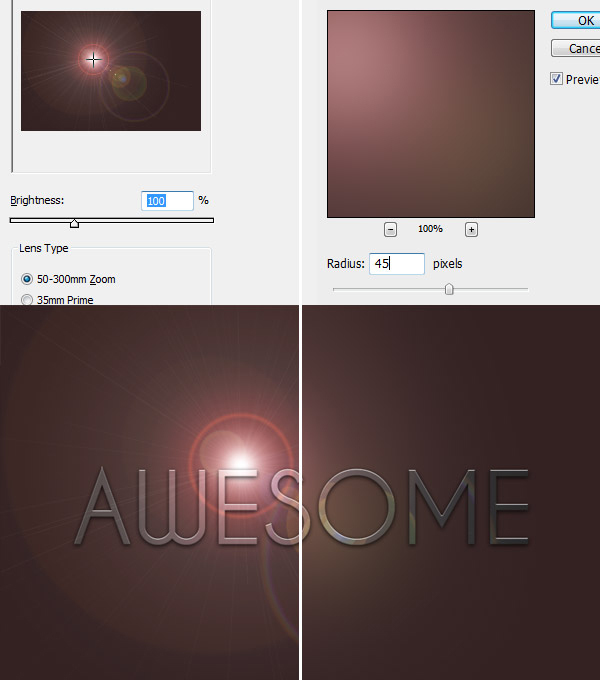
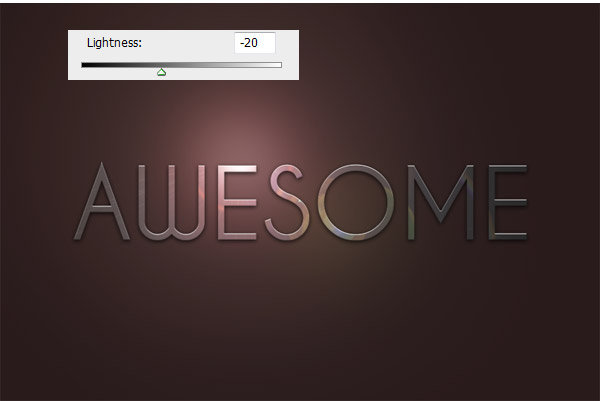
Step 4. Add the Some Light filter to the Background Select the Background layer in the Layers palette, and go to Filters> Render> Lens Flare (or you can press Ctrl+Alt+F to open the window of the filter you last applied). Change Brightness to 100%. Go to Filter > Blur > Gaussian Blur and set the radius to 45 pixels. Then go to Image > Adjustments > Hue/Saturation and set the Lightness to -20.
do repetitive actions.
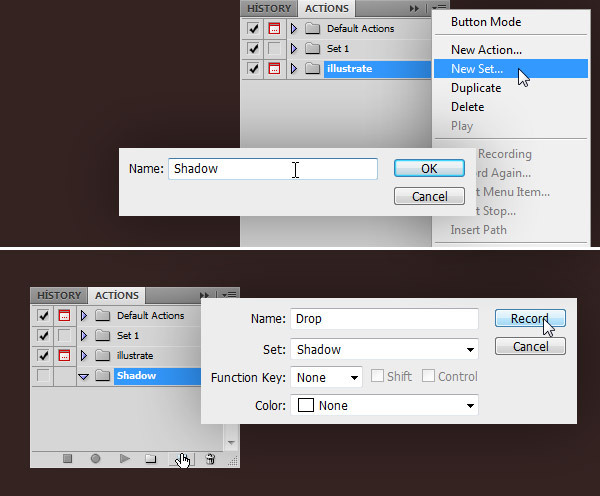
Step 8. Action!

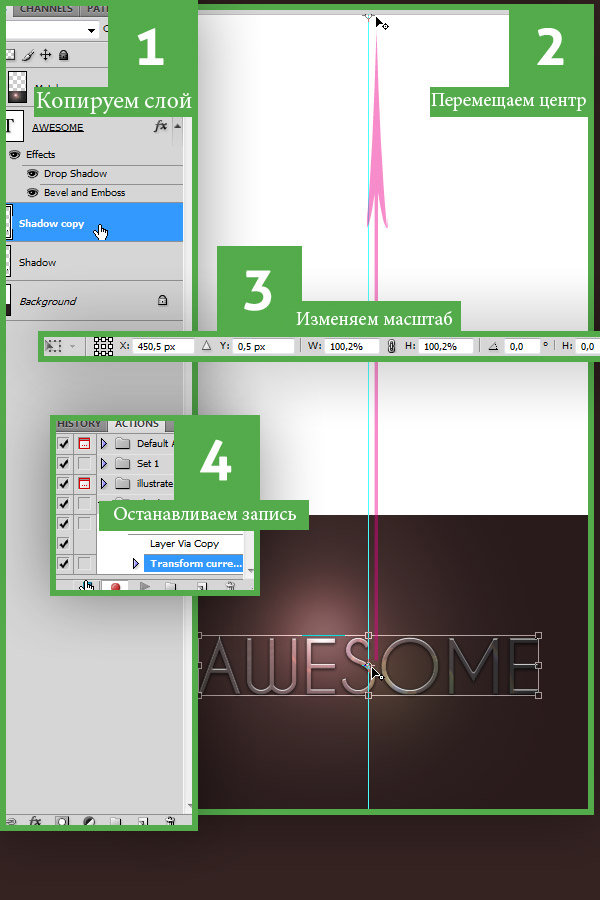
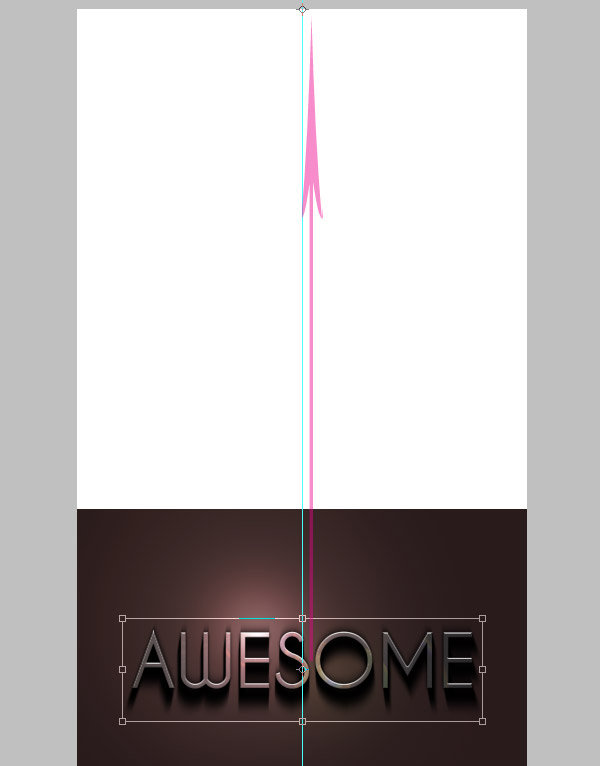
The first thing we'll do is duplicate the "Shadow" layer by pressing Ctrl+J. After clicking Ctrl+T to enter Free Transform mode, move the center of the transformation to the top edge of this document, as shown in the image below. Now change the horizontal and vertical scale to 100.2%, click on the Commit Transform button or press the Enter key twice. Finally, in the action bar, click on Stop. We've finished recording the action, now it's time to play it back.
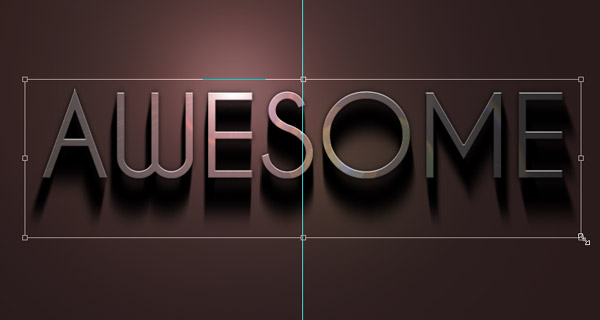
Step 9. Drop Shadow - more action!
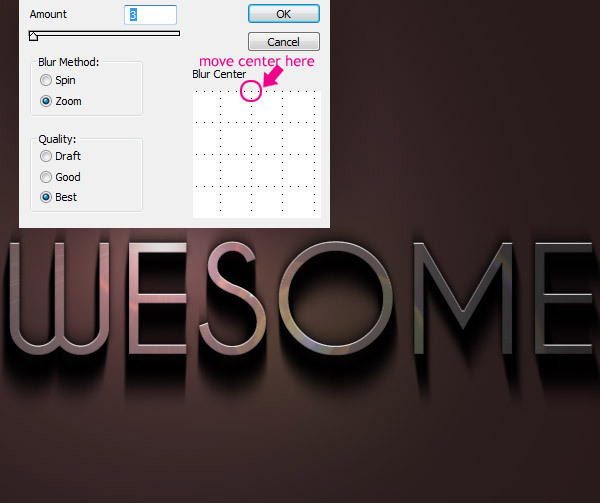
Make sure the "Shadow copy" layer is selected, go to the Action panel, select Drop, and then press the play button 12 times. Then select all the Shadow layers in the Layers palette and press Ctrl+E to merge them. Step 10 Add some blur. Go to Filter > Blur > Radial Blur, move the center up and use these settings: Amount => 3, Blur Method => Zoom, Quality => Best.

Step 11: Finishing the Shadow.