What could be more elegant, more laconic and beautiful than a completed floral composition of flowers and greenery, skillfully decorated with packaging materials.
To ensure that your bouquets always attract the eyes of buyers, let's look at the types of flower packaging and consider in which case each of them will be most appropriate.
Let's start with the fact that packaging can be natural or synthetic. And although it is believed that natural packaging looks more noble, synthetic materials are also widely used by experienced florists and have their own advantages.
Let's look at the most popular synthetic packaging materials.
- Colored and transparent film– one of the most popular and affordable materials in bouquet decoration. The wide variety of colors and relatively low price make film the most popular material among bouquet makers. In addition to plain and ornamented films of various colors, every florist must have in their arsenal a sufficient quantity of white and transparent films for packaging elite flowers on tall stems.

- Organza – smart synthetic packaging material with shimmer, often used by florists in wedding bouquets. Therefore, stores specializing in making formal bouquets should have a sufficient supply of white organza. But brightly colored organza ribbons are good to use for decorating packaging and wrapping stems.


- Artificial mesh has a wide variety of colors and shapes. It can be either plain or decorated with lurex. Goes well with other packaging materials, such as felt. This type of packaging holds its shape well, which is why it is popular both as a full-fledged packaging material and as a packaging decorative element.


Now let's move on to natural packaging.
- Felt - The material is surprisingly light and soft to the touch, perfect for packing a scattering of flowers. For this purpose, you can use either plain colored felt or felt with a colored print. This type of packaging is perfect for flowers with long stems. But florists still recommend packaging lilies and very tall roses in cellophane, but in no case in colored cellophane, as it simplifies the bouquet.


- Sisal– a natural fiber from agave leaves, an excellent material for wrapping short-stemmed and medium-length flowers. You can use both sisal in rolls and ready-made sisal frames. However, it is worth remembering that you should select the color of such packaging with extreme caution, so as not to visually make the bouquet heavier. The best option will be the use of flowers present in the bouquet. For example, it is better to pack a composition of red and pink flowers in pink sisal.
Designers and florists also use soft sisal in bags when decorating interiors, gifts and bouquets.


- Jute mesh and fiber – natural materials that give the bouquet a natural look. This type of packaging is used in status business bouquets, but it is better not to pack a romantic delicate bouquet in jute materials, as they make the flowers too strict. Exotic flowers such as strelitzia, anthurium, protea and others will be ideally combined with these materials.
Combinations of these materials in compositions with dried flowers are also interesting.


I would like to pay special attention ribbons, used in floristry. Tapes come in different widths, densities and colors. In specialized stores you will find an abundance of colored satin and polypropylene ribbons with and without embossing; plain and with a pattern; wide selection of braid, incl. and with decorative stripes; polypropylene metallized tapes; as well as ribbons imitating an aspidistra leaf. Jute has also proven itself to be excellent in decorating bouquets using coarse natural fabrics. Which ribbon to choose in each specific case depends on the type of packaging used and the personal preferences of the florist.


When arranging flower arrangements, it is worth remembering that bright bouquets are best packed in transparent film. This will highlight the natural beauty of the flowers. If you doubt color combination bouquet and packaging, it is better to use universal colors - beige, white and green.

Do you want to open a flower shop? Explore our new video course on the website www.Start.FlowerBusiness.ru!


 Flower market in Moscow at Rizhskaya metro station
 The most beautiful flower shops in the world
 The bride's bouquet: fashion trends wedding season 2018
 What do flowers or the language of flowers mean?
Hello, dear girls! Due to your numerous requests, I am adding a master class on forming organza in an organza bouquet. But since we decided from beginning to end, I will tell you from the very beginning how I make an organza bouquet. There are a lot of photos, I will describe in detail. How It turned out that it was not so easy to capture the process by tucks, but I tried to convey to you everything down to the smallest detail. Therefore, if something is not clear, ask questions. So, put aside all fears and move forward! Start with mini-bouquets!
Let's start with tools and materials, as I think this will be especially useful for beginners. Today I will tell you how I make a bouquet on a penoplex circle, as well as 2 ways to form organza.
So, materials. To create such a bouquet we will need:
1.Organza (I have a roll 9mx70cm)
2.Corrugated paper
3.Bamboo skewers 30cm (required!) or wire
4.Beads
5. Penoplex (I have already cut out a circle with a diameter of 19.5 cm)
6.Scotch tape wide and narrow
7.Satin ribbons, ribbon for gift wrapping
8.Glue gun
9.Pliers
10.Scissors
11.Ruler
12.An ordinary clothespin, or any other clip
13. "Raffaello" candies - 15 pcs (I have them already screwed to the skewers).

Very often I make bouquets on a penoplex circle. For some reason, my customers like the candies to be at a distance from each other. I also used the basis for a hand bouquet according to Sveta Motul’s MK, Olyusha Titova has a Bouquet MK on this basis (http:// stranamasterov.ru/user/49497), also used circular arrangement in bouquets, this method is perfectly described by Valentina V.L. in her wonderful master class (http://stranamasterov.ru/node/689131).
So, I start by preparing the blanks. I cut out a foam circle (in this case I have a diameter of 19.5 cm), apply hot glue in a chaotic pattern and glue it on corrugated paper the top part of the circle and the side. I don’t use double-sided tape, then it’s difficult to insert the sticks.

I pasted it over, I have 15 Raffaello candies, and with a felt-tip pen I make marking points where the candies will be located. So that everything is even and beautiful).

Next, I prepare the candies, either attach them with tape to a skewer or wire (don’t forget to bend the edge of the wire to pierce the candy), or wrap them in cling film. I think everyone already knows this.
I make rectangles from organza 20x14cm.

I bend it, about 5 cm, make a corner, put the candy, hold it tightly, twist it into organza, without letting go, make a corner on the other side. Holding the candy tightly, I twist it at the base, this can be seen in the photo, and tie it with a plastic ribbon (it is very convenient for me when tying). We did the same with other candies.

Next, I prepare the loops. I have satin ribbons with lurex (I like them). We try the loop on the candy. We cut identical ribbons. We glue it together, making a loop, with a drop of hot glue and glue it to the candies. This way, the loops will all be even.


I bite off the sharp part of the skewer with wire cutters and wrap it tightly with wide tape as close to the base as possible with the candies.

We cover the handle with corrugated paper. We have a blank with candies ready.


I bend the edge of the paper about 8-10 cm, wave it. I glue it on both sides with a drop of glue.

Here I already move to the sofa, I need a lot of space, and it’s more convenient to watch what’s happening from top to bottom. We measure out the organza. We put paper on it, cut it off. On one side, the organza should look out about 20-30 cm (I always have about 20 cm). Total means organza more paper by 40 cm. One piece of organza turned out to be 75 + 40 = 115 cm long.

We cut off a second similar piece of organza. In total we cut 2m30cm.

We put one piece of organza aside for now, and glue the other to the corrugation in several places with a drop of glue. I am writing down all my measurements, the bend of my organza is 17 cm.

We take the blank with candies and wrap it in our first layer of organza with corrugated paper. I push the organza aside and glue the paper, as many people probably do. I didn’t show you anything new here, but still.

Then I straighten the organza and bend it so that the seam is neat. I have always been interested in such details as how to make the seam neat. And through numerous trials and errors I came to what I am telling you about now).

Next, I take the ribbon and tie it tightly closer to the base. The candy should be covered by about half! Then I form the organza, pull it out from under the ribbon, creating airiness. last photo you can see what should happen. Girls, photos at different times of the day, night, evening and day. Therefore, I apologize.

Next, we glue our first layer to the foam base. We apply the glue in small sections, so that you can press it with your hand. We press, hold, wait, take our time until the glue sets. This is important! And so on in a circle, slowly, carefully.

This is how we press.

Well, here it is, a bouquet still in the first layer of organza, but already beautiful).

We take the second piece of organza, wrap the bouquet in it. Fold it in at the junction (seam) by 4-5 cm. Glue it with a small drop of glue at the very edge.

This is how it should look.

We tie it with a ribbon, creating airiness. Like this. Sometimes I pull it out from under the ribbon in some places. Make sure it’s beautiful!

And finally, our long-awaited tucks. We take the first and second layers of organza (I start gluing the beads from the seam!), connect them, fix them with a clothespin (usually I glue the beads while holding the bouquet with my knees, so my hands are free and comfortable.) Apply glue to a small bead drop. With my left hand, in which the bead is, I hold the fabric with two fingers, the middle and ring fingers (you will see it later in the photo), with my right hand I remove the clothespin, glue the bead. I do all this quickly. I press the bead well, wait until the glue sets. I press it with my hand .But you can press it with the same clothespin, it’s in your hand. I’ll show you in the photo below.

And so we go in a circle. The clothespin serves as a retainer and helps to glue the beads at the same distance. I have a distance between the beads of 9 cm (approximately!). You can make the distance smaller. Of course, you can sew the tucks, but for me it’s more convenient and quick, I’m so used to it .
In the bottom photo I press the bead with a clothespin.

Each of us perfectly understands that a lot depends on how the bouquet is packed, but most of us simply do not know how to do this! This is why we prefer to buy ready-made bouquets, although in vain, you can learn how to pack them yourself!
Bouquets wrapped in organza turn out to be very beautiful and original. In addition, organza has been used relatively recently as a packaging material for flowers.
What is organza?
This is a slightly harsh translucent fabric, the shades of which can be varied. Due to its rigidity, this material holds its shape perfectly and does not crumble when cut. The variety of shades allows you to use this material for absolutely any color.
Do not forget that it is better to pack more noble plants in such “rich” material, because it is rarely suitable for wildflowers. If desired, organza can be used in combination with mesh or regular film.
Having chosen the desired shade, decide whether you will pack the whole bouquet at once or each flower separately. Cut the organza into squares with a side of 20 cm (for each flower) and take one large piece of organza (1.5 meters) for the entire bouquet.
Fold the small pieces in half and fold the outside into a “bag”, into which we place a bud and a branch of any beautiful ornamental plant. We wrap the bottom with thick thread. We decorate each flower this way. Then we take them in our hands and, cutting off the stems, form the height of the future bouquet. We connect the flowers together with tape, and then wrap them in thick corrugated paper, its color should be several tones darker than the color of organza, and secure it. Set aside.
Using a stapler, the main flap along the upper edge is decorated with a decorative ribbon, the shade of which is one shade darker than the organza tone. Wrap the bouquet with the entire fabric so that the top is free, and at the base you need to pull it tightly together. You should end up with small tucks. We fix it tightly at the base.
Afterwards the bouquet needs to be decorated. The organza is straightened and laid out in waves. Using a stapler and staples, you can create folds or ruffles. Can be decorated with beads. It is especially necessary to highlight the edge of the bouquet; usually a voluminous bow and a bright satin ribbon are attached to it. They “sit” on one of the flowers on top decorative butterfly or something similar. Try not to overdo it with decoration, everything should be in moderation.
The uniqueness of the image does not depend on the cost of the outfit, but on the exquisite little things that make it perfect. Organza flowers purchased or made with your own hands will be an ideal addition not only to wedding or evening dresses, but also to children's dresses.
Can be used as decoration for curtains, decorations for postcards and for many other small things. The use of these cute compositions depends only on your imagination. To make flowers, you need to understand how the fabric will lie in the finished product. First, let's look at the properties of fabric and types of organza.
Organza - fabric description
Organza was previously made from silk, then from viscose. Modern manufacturers use polyester thread - the fabric is transparent and weightless, but at the same time rigid and holds its shape well.
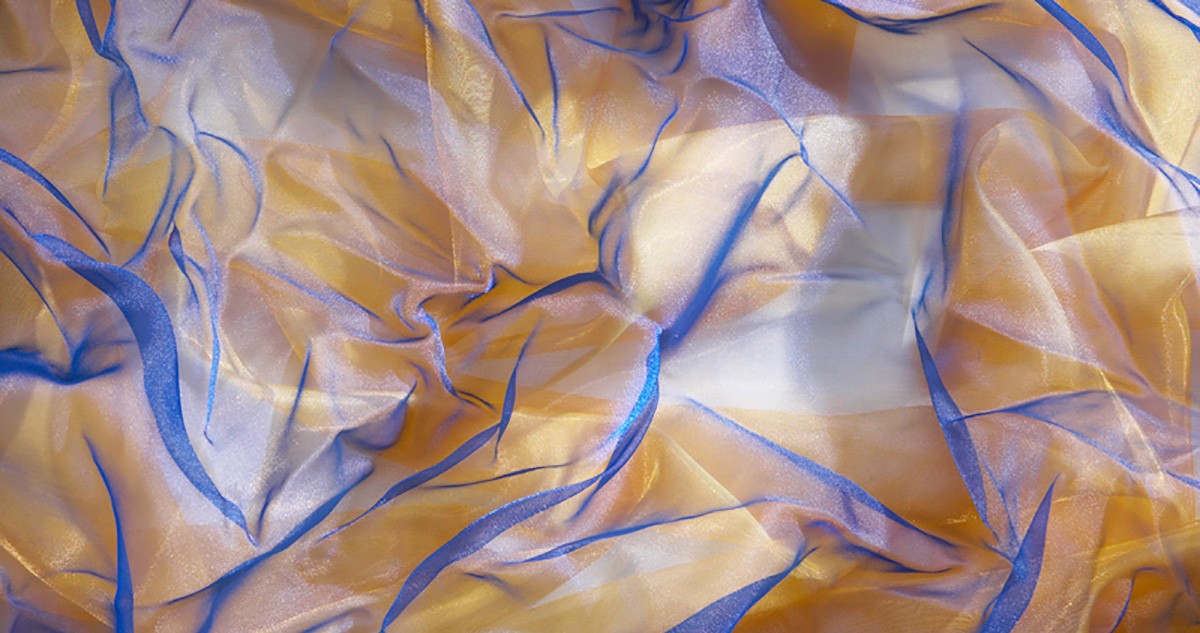
This is ensured by tightly twisting two threads together, and depending on their thickness and color, the results are different kinds fabrics:
- matte or shiny,
- gradient or chameleon,
- plain or rainbow
- with spraying of various colors,
- with jacquard pattern or embroidery;
- tape of various widths.
Not every fabric is suitable for making flowers. For example, organza with embroidery is used to sew curtains or dresses. Matte and shiny plain fabrics are the most popular among needlewomen.


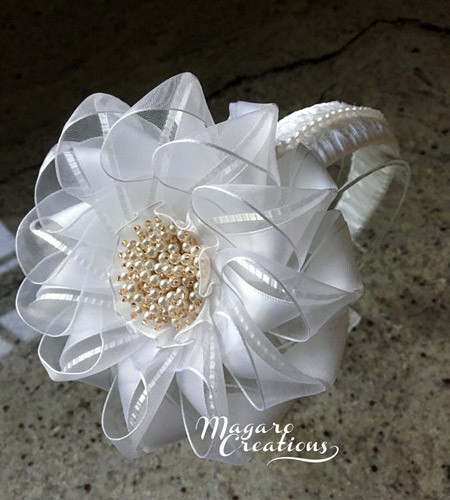
Shiny organza is a favorite material for flowers on bows,
hair decorations and brooches
Spectacular flowers for bright outfits are made from coated organza.

Sprayed organza looks festive, and flowers made from this fabric would be appropriate in a bride’s outfit
For romantic looks, fancy flowers made of gradient organza, chameleon or patterned fabrics are suitable.

Gradient organza is great for fantasy looks

Organza chameleon - for complex, iridescent colors

Gradient colored ribbon produces charming flowers that can be used to create bouquets, including embroidered ones.

A cute summer look will be complemented by a patterned organza flower.
It’s easy to create organza flowers with your own hands – the main thing is to know the basic techniques. For this purpose, Krestik has prepared a review of simple master classes.
Basic principles of creating organza flowers
The creation of any, even the most exquisite, flower or complex composition begins with preparing the parts and connecting them in a certain sequence. Needlewomen have come up with several techniques that help create floral masterpieces:
- classic with buns,
- with heat treatment,
- kanzashi,
- from ribbons.
It is easier for beginners to master the technique using heat treatment of petals, while experienced craftswomen create their masterpieces using several techniques.
Classic floristry

This technique is called silk floristry or Japanese technique. The ancient art of creating flowers from silk came from Japan. However, it is also applicable to other fabrics: viscose, cambric, organza. To make flowers you will need a soldering iron and a set of special brass tools on a handle. It includes round balls of various diameters - boules, as well as smoothers, knives, heels, hooks, dies and special tools for chrysanthemums, lilies of the valley and fantasy flowers.

The petals are cut out according to the pattern, starched or kept in gelatin and dried - due to this, the edges will not fray, and the petal will keep its shape.
YOU WILL NEED IT
The archive will be useful when creating them. Free download!
To give natural bends, the blank petal is placed on a special pad and passed over it with a hot tool. Then a flower is assembled from the finished petals on a thread.
MK on making flowers using Japanese technique:
Simple flowers with heat-treated edges
Preparing the petals is similar to the classical method: you need to cut the blanks exactly according to the template.

To prevent the edges from fraying and fraying, they must be processed. This will require a candle. Since organza is made of synthetic fabric, it does not burn, but melts. This is simplicity and complexity at the same time: the petal easily takes on the required shape, but it must be melted carefully, otherwise you can ruin the workpiece by melting the excess. The peculiarity of the melted edge of organza is a rounded edge of a darker shade. Thanks to her, the petals look especially charming.
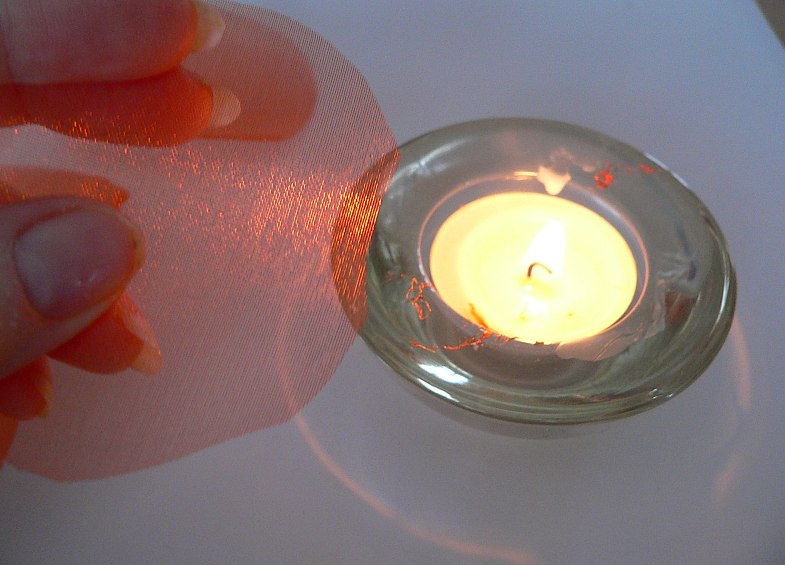
The flower is assembled onto a thread, and the core is decorated with beads, beads, and sequins.
The flower will look more organic if the petals are not connected directly in the middle, but each one is moved a little.

Kanzashi
This technique is universal because it allows you to make flowers both from blanks cut from fabric and to use organza ribbons. The point is that each petal is a fabric folded many times. Individual elements can be fixed with a thread or the edges can be melted over a flame, thus gluing them together.
The technique is most suitable for creating small flowers intended for decoration, photo frames, cards, decorating gift boxes and for implementing countless creative ideas.
Instructions for making organza flowers using the Kanzashi technique:
Ribbon flowers
This technique is the first step in and an excellent option for beginning craftswomen. The organza ribbon has an edge, so the petals look neat, and only the edge needs to be treated with fire. The width and length of the ribbon depends on the intended size of the flower. Creating flowers using this technique is an excellent option for joint creativity with children.
Exquisite organza flowers for special occasions
In the techniques discussed above, the edges of the petals are only exposed heat treatment. You can add chic with a special finish instead of melting or on top of it. This flower will become an exquisite decoration for a wedding bouquet or a delicate decoration for clothing. Let's learn how to create elegant flowers from organza, and the master class will help us with this.
To make this type of organza flowers - perfect option, since it is quite rigid and will withstand the load of glitter or small beads glued to the petals.

To make flowers we will need:
- organza,
- transparent fabric glue,
- white or silver glitter,
- scissors and pins,
- sewing needle and thread to match the fabric.
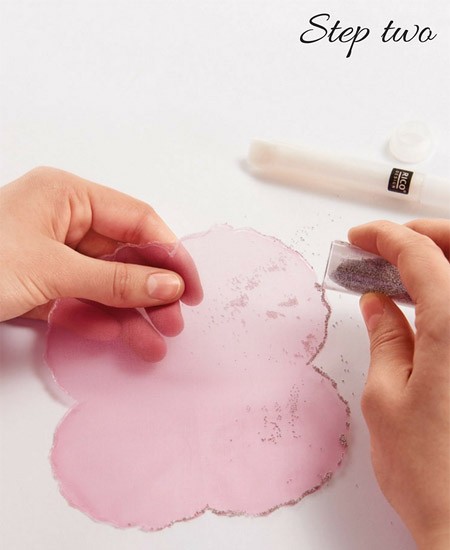
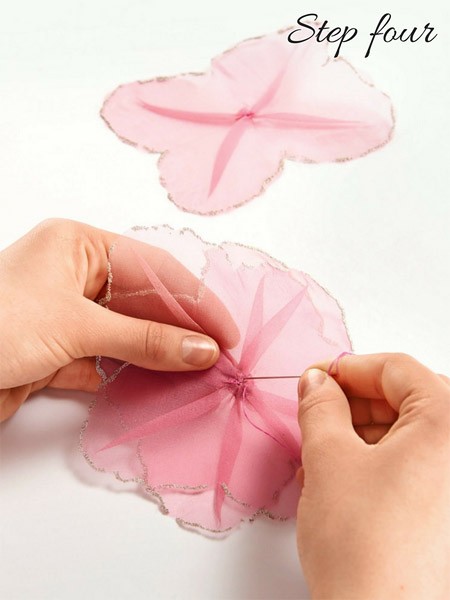
First step. Cut out petals according to the template. The required quantity and size depend on your idea. For a delicate cup stand, two petals are enough.

Second step. Gently coat the edges of the petals with transparent glue, sprinkle them with glitter and dry.
If you are creating a flower to decorate clothes, then it is still better to melt the edges over a candle - this will prevent the threads from fraying, and then decorate with glitter.
Third step. Using a thread to match the fabric, sew large stitches into the middle of the petal. When pulled together, folds are formed that need to be secured with additional stitches. If you are making a napkin for a cup, you just need to slightly tighten the folds and then straighten them, giving the flower some airiness.
If you are new to flower making, first practice on scraps to select the appropriate fold size.

Fourth step. Connect the finished petals into a flower with a needle and thread. The middle can also be decorated with glitter or beads. The finished flower head is glued to a wire or a wooden stick, which, if desired, is decorated with floral tape.
Here you will find the original of this master class, from which you can download the part templates!
Flowers that are more sophisticated and interesting are made more difficult, but careful adherence step by step instructions will help you cope with the task!
Master class on creating a dahlia from organza:

Master class on creating organza lilies:

Original examples of using organza flowers
As a rule, fabric flowers serve as decoration for wedding and evening dresses, hats, clutches, romantic or in the form. But mini-compositions have a special charm.
Used to decorate the groom's suit, and individual small flowers make excellent decor or photo frames.

An accordion is assembled from a strip of organza onto a thread and a needle. Then a crown is cut out of felt.

Using transparent glue (or thread), the crown is fastened into a ring and sits in the center of the organza skirt.
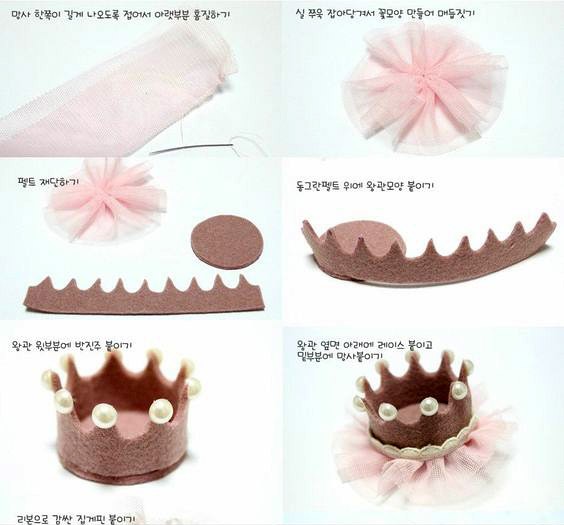
The final decor is optional: beads, lace, sparkles, pendants. The crown can be attached either to a hairpin or a clip-on clip. Your little one will be delighted!
Decorating wedding dresses is a limitless field for imagination. You can use large beads and a narrow organza ribbon to crochet a necklace or bracelet.

Organza is a great material for creating delicate, elegant or chic and catchy flowers. A variety of techniques will allow even novice craftswomen to create masterpieces.

Hello, dear girls! Due to your numerous requests, I am adding a master class on forming organza in an organza bouquet. But since we decided from beginning to end, I will tell you from the very beginning how I make an organza bouquet. There are a lot of photos, I will describe in detail. How It turned out that it was not so easy to capture the process by tucks, but I tried to convey to you everything down to the smallest detail. Therefore, if something is not clear, ask questions. So, put aside all fears and move forward! Start with mini-bouquets!
Let's start with tools and materials, as I think this will be especially useful for beginners. Today I will tell you how I make a bouquet on a penoplex circle, as well as 2 ways to form organza.
So, materials. To create such a bouquet we will need:
1.Organza (I have a roll 9mx70cm)
2.Corrugated paper
3.Bamboo skewers 30cm (required!) or wire
4.Beads(0.8mm or smaller,do not use very large beads!)
5. Penoplex (I have already cut out a circle with a diameter of 19.5 cm)
6.Scotch tape wide and narrow
7.Satin ribbons, ribbon for gift wrapping
8.Glue gun
9.Pliers
10.Scissors
11.Ruler
12.An ordinary clothespin, or any other clip
13. "Raffaello" candies - 15 pcs (I have them already screwed to the skewers).

Very often I make bouquets on a penoplex circle. For some reason, my customers like the candies to be at a distance from each other. I also used the basis for a hand bouquet according to Sveta Motul’s MK, Olyusha Titova has a bouquet MK on this basis (), and also used in bouquets and circular assembly, this method is perfectly described by Valentina V.L. in her wonderful master class ().
So, I start by preparing the blanks. I cut out a foam circle (in this case I have a diameter of 19.5 cm), apply hot glue in a chaotic strand and cover the top and side parts of the circle with corrugated paper. I don’t use double-sided tape, then it’s difficult to insert the sticks.

I pasted it over, I have 15 Raffaello candies, and with a felt-tip pen I make marking points where the candies will be located. So that everything is even and beautiful).

Next, I prepare the candies, either attach them with tape to a skewer or wire (don’t forget to bend the edge of the wire to pierce the candy), or wrap them in cling film. I think everyone already knows this.
I make rectangles from organza 20x14cm.

I bend it, about 5 cm, make a corner, put the candy, hold it tightly, twist it into organza, without letting go, make a corner on the other side. Holding the candy tightly, I twist it at the base, this can be seen in the photo, and tie it with a plastic ribbon (it is very convenient for me when tying). We did the same with other candies.

Next, I prepare the loops. I have satin ribbons with lurex (I like them). We try the loop on the candy. We cut identical ribbons. We glue it together, making a loop, with a drop of hot glue and glue it to the candies. This way, the loops will all be even.


I bite off the sharp part of the skewer with wire cutters and wrap it tightly with wide tape as close to the base as possible with the candies.

We cover the handle with corrugated paper. We have a blank with candies ready.


I bend the edge of the paper about 8-10 cm, wave it. I glue it on both sides with a drop of glue.

Here I already move to the sofa, I need a lot of space, and it’s more convenient to watch what’s happening from top to bottom. We measure out the organza. We put paper on it, cut it off. On one side, the organza should look out about 20-30 cm (I always have about 20 cm). Total This means that the organza is 40 cm larger than the paper. One piece of organza turned out to be 75 + 40 = 115 cm long.

We cut off a second similar piece of organza. In total we cut 2m30cm.

We put one piece of organza aside for now, and glue the other to the corrugation in several places with a drop of glue. I am writing down all my measurements, the bend of my organza is 17 cm.

We take the blank with candies and wrap it in our first layer of organza with corrugated paper. I push the organza aside and glue the paper, as many people probably do. I didn’t show you anything new here, but still.

Then I straighten the organza and bend it so that the seam is neat. I have always been interested in such details as how to make the seam neat. And through numerous trials and errors I came to what I am telling you about now).

Next, I take the ribbon and tie it tightly closer to the base. The candy should be covered by about half! Then I form the organza, drag it from under the ribbon, creating airiness. The last photo shows what should happen. Girls, photos of different times of the day and night and evening and daytime. Therefore, I apologize.

Next, we glue our first layer to the foam base. We apply the glue in small sections, so that you can press it with your hand. We press, hold, wait, take our time until the glue sets. This is important! And so on in a circle, slowly, carefully.

This is how we press.

Well, here it is, a bouquet still in the first layer of organza, but already beautiful).

We take the second piece of organza, wrap the bouquet in it. Fold it in at the junction (seam) by 4-5 cm. Glue it with a small drop of glue at the very edge.

This is how it should look.

We tie it with a ribbon, creating airiness. Like this. Sometimes I pull it out from under the ribbon in some places. Make sure it’s beautiful!

And finally, our long-awaited tucks. We take the first and second layers of organza (I start gluing the beads from the seam!), connect them, fix them with a clothespin (usually I glue the beads while holding the bouquet with my knees, so my hands are free and comfortable.) Apply glue to a small bead drop. With my left hand, in which the bead is, I hold the fabric with two fingers, the middle and ring fingers (you will see it later in the photo), with my right hand I remove the clothespin, glue the bead. I do all this quickly. I press the bead well, wait until the glue sets. I press it with my hand .But you can press it with the same clothespin, it’s in your hand. I’ll show you in the photo below.

And so we go in a circle. The clothespin serves as a retainer and helps to glue the beads at the same distance. I have a distance between the beads of 9 cm (approximately!). You can make the distance smaller. Of course, you can sew the tucks, but for me it’s more convenient and quick, I’m so used to it .
In the bottom photo I press the bead with a clothespin.


It turns out like this. The distance between the first and second row of beads is 6-7 cm.