Today, cable lights are very popular. Such a system is successfully used in large trading halls and in small boutiques, in exhibition spaces, in cafes and restaurants. Installation fixtures on a cable will be the original solution for residential premises with high ceilings. The main advantages of this kind of lighting systems can be considered:
Along with the undeniable advantages of installation luminaires on cables has some nuances that must be taken into account when planning the method of lighting in the room
Models of such lighting devices are made of high-strength and at the same time lightweight modern materials. With this is their high price
The presence of large free space in the room. For the installation of suspended light fixtures, high ceilings are a prerequisite. In rooms with low ceilings, such lighting will create inconvenience.
There are many models of pendant lamps, but they all consist of three main parts: the mounting rhea, which is fixed to the ceiling, a decorative plafond designed for a certain number of light sources and suspension cables, such as decorative cables, straps, pipes or reinforced electrical cables . By the method of fixing the cables such lamps are divided into vertical and horizontal.
Installation of suspension lights on cables
Mounting fixtures on cables does not require special knowledge and skills. The whole process is simple and understandable for a beginner, if you follow a certain algorithm of actions.

At the first stage, it is necessary to assemble and install a fixed tire, to which a lampshade will be attached to the cables. The assembly of the rhea into the finished structure can be carried out separately on the floor or directly during installation to the ceiling. The fixtures for different types of ceiling coverings will also be different. Installation to a false ceiling of such fixtures will require special stapling fixtures; On a tension ceiling it is easier to install a mounting rail with chains. The length of the stationary rhea can be different, depending on what you are pursuing, the type of room where you plan to mount the suspended fixtures. Separate the required length of the tire can be done with a conventional hacksaw. To make connection of separate sites it is easy, for this purpose the special mechanism with a latch is provided.
Next, the height at which the fixtures on the cable will be installed should be determined. To adjust the position, loosen the special screws on the mounting rail, select the required length of cables and the power supply cable and fix the position with the same screws. Usually manufacturers establish the maximum possible length of cables and electric cable. Not useful cable can not be cut off, but hidden in the mounting plate, in case the length of the fixture will have to be changed.
Installation pendant lighting to the installed mounting rail with the cables removed and the power supplied, it does not require significant effort. Usually, the lampshade is fixed using simple snap-in mechanisms or rotary systems. It remains to place the bulbs in the cartridges, connect the phase and make the inclusion.
In use, the luminaires on the cables are comfortable and functional. They will approach the design of any living quarters and will perfectly cope with the task of organizing the required level of illumination of large industrial halls and halls.
Recall that there are two main criteria for choosing lighting. This is the power of the light flux and the economy of electricity consumption. Ever since the lanterns used for street lighting, and which were suspended on cables in the middle of a street or a carriageway, a large number of attempts have been made to combine these two criteria. It was not always possible, modern technology allows it today. Therefore, pendant lamps on cables, used today to illuminate industrial facilities, streets, roads, offices and living rooms, at the peak of popularity.
Such lighting structures in our country are called string or cable, in the West they have a different name - track. But the essence of this does not change, the design is the same. It was she who discovered new possibilities of directional light distribution, while the light flux was distributed uniformly throughout the room. Most often, these lamps are used in rooms with high ceilings, in rooms where light-weight ceilings are installed, as well as in places where zoning is necessary.
Rope systems
Such a name lighting systems have been obtained because of the cable tied between the luminaires, to which they are attached. On it is also laid the supply line of electricity. Most often, stretching is made from the wall of the room to the opposite wall. The suspension of the luminaires on the cables can be both vertical and horizontal. Very often such a lighting system uses a combined version. It allows you to make the lighting either local or general.
Therefore, most often such a system is used to illuminate industrial enterprises. It allows you to cover the whole shop, as well as individual jobs, which is very convenient, and as practice shows, it is economical. In addition, such lighting systems are easy to install and maintain. There is no need to conduct wiring on the bearing structures of buildings, especially the ceiling, which in industrial premises are most often beams and farms. It is difficult to work for them. And with cable systems, everything is much simpler. You just need to fix the ends of the cables on the two opposite walls and stretch them. By the way, if small lamps are used as a lamp, it is possible to install a system consisting of a single cable, which also reduces the cost of installation and organization of lighting.
The so-called household version represents the same cable, only a small diameter, which is very similar to a string. It is from here and the household name of the system - string. Such a cable is a braided in one string copper or aluminum wires. Usually household cable lights are two strings, one of which is used as a phase, the second is a zero contour. The distance between the strings varies in the range 3-20 cm.
There are two types of cable lighting systems:
- low-voltage;
- high-voltage.
For the first manufacturers, a step-down transformer and a dimmer are added. As for the second type, isolated strings are used for them in the form of a cable with a larger diameter than in the first version.
Attention! If the power of the lighting devices (total) is more than the maximum in the passport, then the system must be divided into smaller sections. In this case, each section is set up its own transformer. The connection between mini-systems is made by special connectors.
Vertical construction
In fact, vertically suspended fixtures to the ceiling on the cables were replaced by lighting fixtures that had a chain or tube as fasteners. Experts believe that the cable used as a suspension is a more practical option. Especially when it comes to high ceilings in industrial and civil facilities. Plus, the cable is a decorative element, which can be beaten differently. And this is a great element when it is necessary to lower the height of the ceiling and the lighting itself, for example, above a desk or a dining table in a restaurant.

It should be added that the vertical version is in perfect harmony with other types of lighting fixtures, it perfectly zonates the room, with its help one can focus on a certain object of the interior.
There is another version of cable lighting systems, which has one serious difference from the previous version. Such systems are also vertical, because the luminaire itself is suspended on a flexible cable. But the horizontal part of the system, which is conductive, is inflexible. There are two options:
- The bus-bar construction is made of aluminum profiles, which includes so-called tracks made of copper.
- Sandwich system of current conductors. These are two layers of conductors, between which the dielectric is located.
Both options do not require tension. However, when choosing the number of lamps, it is necessary to take into account the location of their installation, and, more precisely, the distance between them. It should be at least 50 cm, but not more than 150 cm. Everything depends on the weight of the fixtures. Such a distance makes it possible to avoid deflection of the carrier part of the entire lighting structure.
Attention! Power can be connected to either side of the supporting structure. A ground loop must be installed. In this case, any lighting fixtures can be installed in the system, even with a rotatable casing.
Horizontal structures
The horizontal type is tensioned cables, which represent a wire rod with a diameter of 6-8 mm. That is, they are galvanized wires, twisted into one bundle.
System Characteristics:
- the sag may be 30-60 cm;
- span for a tensioned cable: 6-12 m;
- if the room has large dimensions, the system is divided into several smaller ones with its fastening.

The cable to the walls can be fixed with anchors of various types: through, with a turnable dowel, by welding. But the anchorage to the anchor can be carried out using the following technologies:
- using a loop with a steel clip and bolts;
- twisting around the cable itself for a length of at least 8 cm;
- using a pipe that is flattened.
The draft of the cable structure is always carried out manually. If the span is small, then use a tension clutch, with a large one - a winch. Often, long lighting networks are reinforced with lateral stretches, which are connected in places of installation of lamps. As a delay wire is used.
Horizontal string structures used in everyday life and in office buildings are installed in exactly the same way as cable lines. The only requirement is a mounting height of at least 2.7 m. At the same time, designers often use the flexibility of strings, building various lighting system configurations under the ceiling. This installation along the walls, across, diagonally, in a circle and so on. Variations on this topic - a huge number.

In the event that the walls are made of materials that you have doubts in terms of reliability, the strings can be fastened to the ceiling (but not to the gypsum board), to the posts that are mounted on the floor, to the ceiling vertical suspensions and so on.
On the Russian market pendant lamps on installed cables came from the West, where industrial aesthetics and ergonomics are given great attention. Over time, these models were becoming more popular, so the systems migrated to residential and office space.
Similar entries:
Efficiency of industrialization of electrical installation works.
One of the most effective ways to increase labor productivity, improve quality, and accelerate and reduce the cost of production of electrical installation work is their industrialization and the use of new technology. These requirements are met in the networks of fluorescent lighting cable wiring, wiring, mounted with the use of lighting busbar trunking systems, boxes, slots, mounting profiles, etc. The carriers of these wires (cables, structures, profiles) are used both for laying wires and cables, and for suspension of fixtures.
These types of wiring make it possible to carry out most of the installation work in the form of separate assembly units, including the manufacture of all the components and parts of the wiring and, in some cases, depending on the type of wiring (as, for example, for cable wiring), the execution of branches to lighting electrical receivers in advance , regardless of the state of the construction work at the sites for which they are intended. At the same time, the assembly is carried out mainly from products manufactured in factories.
Installation of pre-fabricated lighting network elements directly at the installation site should be carried out after the construction of the building part of the building in accordance with the requirements of SNiP 111-33- 76.
Prior to the commencement of works, the construction part of the structure is to be installed under the act, and special mounting areas are installed on the bridge cranes mounted by this time. If there are no overhead cranes, then the mechanisms that replace them (hydraulic lifts, aerial platforms, erection scaffolds), depending on local conditions.
Large-block products (lighting busbars, blocks of complete boxes, slot structures, etc.) from the workshops, where they are assembled, are transported to the assembly area in inventory reusable containers. In addition to large-block products from the workshops, inventory equipment, tools and small mechanization tools are delivered to the assembly area. The personnel of the installers at the workplace must be instructed by the responsible manufacturer of the work (foreman, foreman) for safety in strict accordance with the current safety instructions for the electrical installation work.
Mounting fixtures on cables.
Compared with other types of wiring, cable wiring is the most industrial, cheap and convenient to carry out. They require a small amount of punching work, necessary only for installation of fastening structures, the number of which is relatively small. The use of cable wiring allows you to carry out most of the work on the installation of the electricity network simultaneously with the construction works and only the installation of luminaires to perform after finishing the finishing works.
Cable harnesses by suspension method are subdivided into wiring with direct fastening of wires and cables to the cable, wiring with fastening of wires and cables on cable suspension brackets and cable wiring with APT, АВТС-1 and АВТС-2 wires with a steel supporting cable built in them. As supporting cables, a galvanized steel or hot-rolled wire with a diameter of 5 to 10 mm or steel ropes (cables) woven from steel zinc-coated wires with a diameter of 4.6 to 6.8 mm is used.
For cable wiring with wires of APT or AVTS grades, an insulated steel cable is used, enclosed between insulated conductors of the wire. Its diameter depends on the number and cross-section of the conductors in the wire. The AVTS-2 brand wire is manufactured with reinforced supporting cable.
In each individual case, the choice of a carrying rope is made during the development of the design of the electrical installation based on the calculation data, taking into account the length of the span of the cable wiring and the design loads on the rope. For the calculation of the supporting cable, in addition to the payload of the fittings, wires and cables, an additional weight of 80 kg, applied during the installation or operation in the center of the span (in the form of the ladder on which the worker is located) between the anchorages is taken into account. The choice of the supporting element of the cable wiring - wire or rope - is made from the conditions of providing a 3-fold margin of mechanical strength for steel wire and a 2.5-fold margin for the steel rope.
Table 13. Dependence of the sagging arrow on the load and the diameter of the wire in a span of 6 m
Strela of sagging, m |
The diameter of the wire. |
mm. under load |
||||||||
In the absence of data in the project, you can use the data shown in Table. 13 and 14. The tension of the cable is made with a force not exceeding 0.7 of the force permitted for a given carrier cable. This requirement for the distances between the vertical cable suspension of 6 and 12 m is satisfied by the following sagging arrows: 6 m-100-150 mm; 12 m -200-250 mm.
Table 14. Dependence of the sagging arrow on the load and the diameter of the steel rope in a span of 6 m
Arrow I of the sag, m |
Diameter of rope, mm, with load on rope, kN |
||||||||
Efforts for cables are given in Table. 15 and 16.
Table 15. Allowable force on the wire
Diameter of wire, mm |
Weight of 1 m wire, kg |
Allowable force on the wire, kN |
Admissible force at wire tension, kN |
Table 16. Permitted forces on steel ropes
Diameter of the rope, mm |
Weight of 1 m rope, kg |
Allowable force on ropes, kN |
Allowable force when pulling the rope, kN " |
Installation of cable wiring is carried out by preparing separate wiring points equal to the distance between the anchorages. In the process of harvesting knots on a tensioned carrying wire, wires are fastened and branches are made to the luminaires (Figure 1), after which the wiring harnesses are wound into coils, labeled and transported to the assembly area for installation. 
Fig. 1. Laying the wire on the cable and fixing the junction box on the perforated strip.
1 - rope; 2 - a perforated strip; 3 - the junction box; 4-band: 5-wire; 6 - string suspension.
The luminaires themselves, after a detailed check, are suspended from the cable ties tightened by a cable.
At the installation site, the work on the cable wiring is reduced to the installation of fastening structures, assembly, lifting and stretching of individual wiring components and installation of fixtures. The supporting cables are suspended between two end anchor hooks attached to the building structures. The length of individual sections of the cable wires depends on the extent and design features of the building and can be different. 
Fig. 2. Anchoring end fasteners for carriers
ropes and ways of their installation.
c - constructions for fastening to groaning; б - a tension bolt with a ring; c - construction for fastening to the wall with studs; d - construction for attachment to a metal truss.
However, in order to constructively simplify the cable suspension system, reduce the total weight and facilitate the industrial manufacture of cable wiring, the distance between the anchorages at the ends of the cable, as a rule, should not exceed 50-60 m.
The forms and design of the end-mounted electrical structures for the cable depend on the characteristics of the locations of their fastening. The most commonly used types of fixing end structures and methods of fixing them to various building structures are shown in Fig. 2. The steel rope (cable) 1 with the hook of the end structure is connected in the following way.
At the end of the rope make a loop, using a steel cage 2, the so-called "koush", and the cable clamp 3, as shown in Fig. 3, a.

Fig. 3. Looping.
a - on the rope with the aid of a thimble and a cable clamp; b - on the wire with a steel clip.
Casing dimensions 
The clip-and-cushion is an elongated steel device of the sheath shape, which protects the supporting cable from crushing and rubbing.
The cable clamp is two oblong bars fastened between three bolts, and serves to tightly clamp the cable when forming a plug. If a steel wire is used instead of a steel wire, the 4 loop is carried out without the hook and clamp by poking the end of the wire through the steel cage 5 and then folding (Figure 3.6).
The end anchoring fasteners provide tensioning of the supporting cable with the help of a nut due to the extended thread on the free end of the hook (Fig. 2.6) or a special tensioning device, the so-called tension clutch, the device of which is shown in Fig. 4, a. If the length of the thread is not sufficient to stretch the cable, then an additional tension coupling is used, which is installed in series with the tensioning device. With its help, the final tension of the supporting cable is made.
The carrying cable, depending on its length, is tightened at small spans manually, and at large - with the use of a block, pulley or winch. Control over the correct tension of the supporting cable is carried out by a dynamometer connected in series with a chain of pulley block or block, by means of which stretching is performed (Fig. 4, b). The free end of the supporting cable is secured by the hook of the tensioning device, to which the traction of the entire cable is transferred after the chain block or winch has been disconnected.
The final stretching of the supporting cable and the adjustment of the boom sled are made with the help of pre-loosened anchor bolts and tension couplings.
To facilitate and unload the supporting cable and its end fixtures in wire rope strips, additional supporting vertical string pendants, longitudinal and transverse pulls, are used. 
Fig. 4. Tension of the supporting cable.
a - tension clutch; b - application of a chain block; 1 - the tension device; 2 - tackle block; 3 - dynamometer; 4 - spot clamp; 5 - supporting cable; 6 - the end of the supporting cable, connected to the tensioning device.
Vertical intermediate suspensions or pull-ups, as a rule, are installed in places of installation of fixtures. The distances between the intermediate suspensions and the luminaires are selected in accordance with the design, taking into account the mechanical loads and allowable sagging arrows. For suspensions and braces, steel wire with a diameter of 3-4 mm is used. The upper end of the hangers and braces is fixed to the trusses and ceiling structures of buildings with the help of special earrings, hooks and clamps (Fig. 5) and in some cases with steel strip: to the stiffeners of the slabs. The lower end is attached to the supporting cable with a cable holder. The hinges at the ends of the suspensions and braces are made in the same way as at the ends of the supporting wire from the wire (Fig. 3, b).
The device of string vertical suspensions and braces for a supporting cable is shown in Fig. 6. 
Fig. 5. Fixing structures for vertical hangers.
a and b - an earring and a hook for fastening to metal trusses; в - a yoke for fastening to ferro-concrete farms. 
Fig. 6. Arrangement of longitudinal string braces and vertical suspensions for loading the supporting cable.
1 - supporting cable; 2 - longitudinal string braces; 3 - spot clamp; 4 - fastening structure: 5 - vertical jet pendants.
Installation of luminaires on cable electrical wiring is carried out by hanging them on a supporting cable with the help of special hanging hooks with clamps, and also directly on structures on which wires with special clips for this purpose are suspended.
An example of suspension of luminaires on a cable with the use of a construction for fixing wires is shown in Fig. 7. 
Fig. 7. An example of a suspension bracket of a fixture on a cable.
1 - suspension of cable wiring with a clip of type У934; 2 - supporting cable; 3 - feeding drive; 4 - tap-changer of type У730; 5 - the hook: 6 - the lamp.
Mounting the chandelier on a stretch ceiling is not a simple task, because an incorrectly installed and connected lamp can not only spoil its appearance, but also damage the canvas. Therefore it is important to understand the intricacies of choosing and fixing the chandelier in advance. Our article will help you in this.
Choosing a chandelier for stretch ceilings
Fixtures for the tensioning structure is better to select at the stage of preparation of the design project, after all for the reliable fastening of the chandelier it will be necessary to fix the hook or mounting platform to the black base. From the shape of the fixture, the distance between the film and the ceiling can depend, in addition, some requirements are imposed on the chandeliers.

When ordering a stretch ceiling, you can consult the designer about the design and shape of the lamp - the specialist will tell you which lights are best for your room. Also you can see the photos of the finished ceiling lighting design projects.

Which chandelier is suitable for your ceiling?
For a room of standard size in a typical apartment, decorated in classic style and low-key colors, matte or satin ceiling of light shade and a chandelier of small height with several not large shades are perfect. The light created at the same time will be soft and diffuse, without shadows and glare, which will create a sense of spaciousness.
For a glossy ceiling or a mirror insert in a multi-tier design, LED chandeliers with many lamps are perfect, reflecting, they create a sense of depth. Thanks to this technique, you can visually raise the low ceilings and zoning the room. The lighting can be supplemented with built-in spotlights.

Such chandeliers on dark mirrored ceilings look equally impressive. It is important to correctly choose their colors and the shape of the lamps. Do not choose too large and ornate plafonds, the effect is achieved through the play of light on the ceiling.
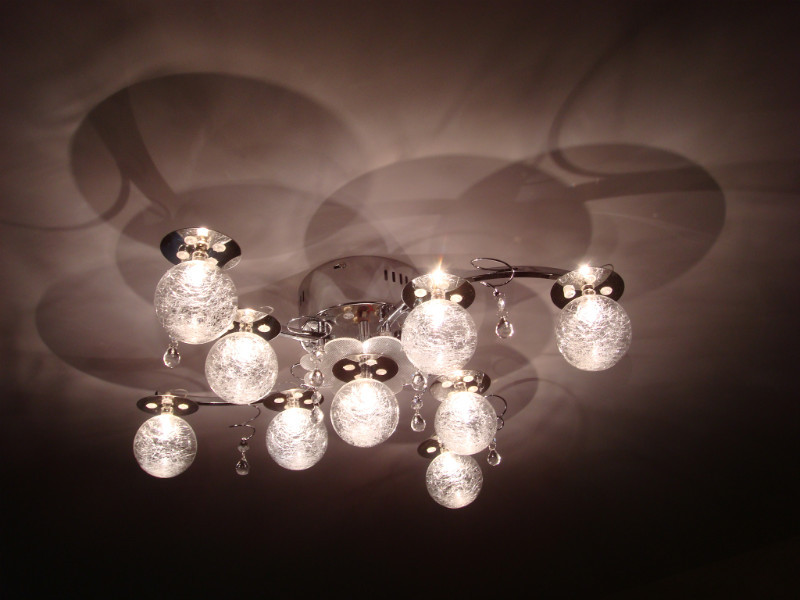
Winning look plafonds in the form of balls of different sizes on the dark satin ceiling, the reflected light at the same time is soft and warm, and the room creates a cozy atmosphere.

When choosing color bubbles, you need to ensure that their shade matches the color of the ceiling, otherwise they will look out of harmony.

Chandeliers with glass pendants are perfect for a bedroom or a nursery in pastel colors.
Light-emitting diodes of complex shape or original plafonds create a light and shadow on the ceiling, such chandeliers decorate the living room. They look better on a colored or dark ceiling.
Whichever chandelier you choose, it must be properly and securely fastened. To do this, in the process of stretching the ceiling, you need to install a mounting or support platform. Masters of stretching ceilings usually do this work themselves. If you decide to mount the stretch ceiling yourself, our tips will help you fix the chandelier on the stretch ceiling.
The ways of fixing the chandelier on the suspended ceiling
Depending on the design of the lamp, it is fixed in one of the following ways:
- on the hook - more often the chandeliers are fastened on a long rod with a small diameter of the base;
- on a simple mounting plate, which is attached to the support platform; this method is suitable for most luminaires;
- on the cross bar - this method is used for massive chandeliers with a wide base.

Preparing the ceiling for different types of fastening has its own characteristics, which are described below. Also it is necessary to lay and check in advance the wiring leading to the fixtures.
Note! The fixing of the hook and support platform to the ceiling must be reliable and durable. For this purpose, it is better to use standard, specially designed for this purpose elements. Remaking the design without removing the canvas will not work.
Wiring Preparation
If you are installing a chandelier on a stretch ceiling in the center of the room, where the wires of standard wiring are removed, you need to do the following.

When installing the chandelier of fixtures in another place, it is necessary to lay new wiring, usually for this use a cable type VVGng-LS. For lighting devices, a cross section of 1.5 mm 2 is sufficient, the number of cores depends on the type of luminaire and the number of lighting steps. The cable laying is carried out by one of the methods indicated in the table, and it should be remembered that for wooden structures the cable can only be laid in a non-combustible metal sleeve or pipe.

Table. Methods of laying the cable under the suspended ceiling and the materials necessary for this.
| Method of laying the cable | Necessary materials | Brief description of the work |
|---|---|---|
| In the corrugated sleeve | Cable, plastic or metal corrugated hose, suspensions and dowel-nails. | The cable is threaded into the sleeve, leaving the ends at least 30 cm on both sides, and the sleeve is attached to the plastic hangers using a dowel-nail system. |
| Plastic box | Cable, plastic cable duct, dowel-nails. | The cable channels are fixed with the help of dew-nails to the ceiling, the cable is laid inside, the cover is closed with the lid coming in the kit. |
| Plastic ties | Cable, ties and dowel-nails. | Screws are fixed to the ceiling on the dowels, cables are fixed to them. |
Note! Wiring should not sag and lie on the linen! It will spoil its appearance.
This type of fastening is often found in classic lamps - a chandelier with several plafonds, fixed on a long rod. The place of fixing the chandelier is isolated by a decorative bowl, attracted to the ceiling. The very technology of suspension is quite simple, it is more difficult to secure the hook exactly at the level that will allow closing the attachment point.

Step 1. The choice of a place for mounting a chandelier depends on the design project of the ceiling. If the luminaire is installed in the geometric center of the room, where there is already a standard hook, the task is much easier. It is enough to increase the hook with the chain of the desired length with the hook on the end and prepare the wiring. During the installation of the blade, the suspension chain and wiring can be removed into the hole in the ceiling.
Step 2. If there is no hook, it will have to be fixed by yourself. To do this, measure the distance from the plate to the level of the finishing ceiling in the place of fixing the chandelier and fix there a piece of bar of this section, which will lower the level to the desired distance.
First, drill small diameter holes in five centimeters from both ends of the bar and a larger hole through which the wiring passes. On the fixing holes mark the ceiling in which holes are made with the help of a perforator. Attach the bar to the dowels and screws, first passing the wires into it. The bar for fixing the chandelier is ready, screw the hook on the thread better after mounting the blade.
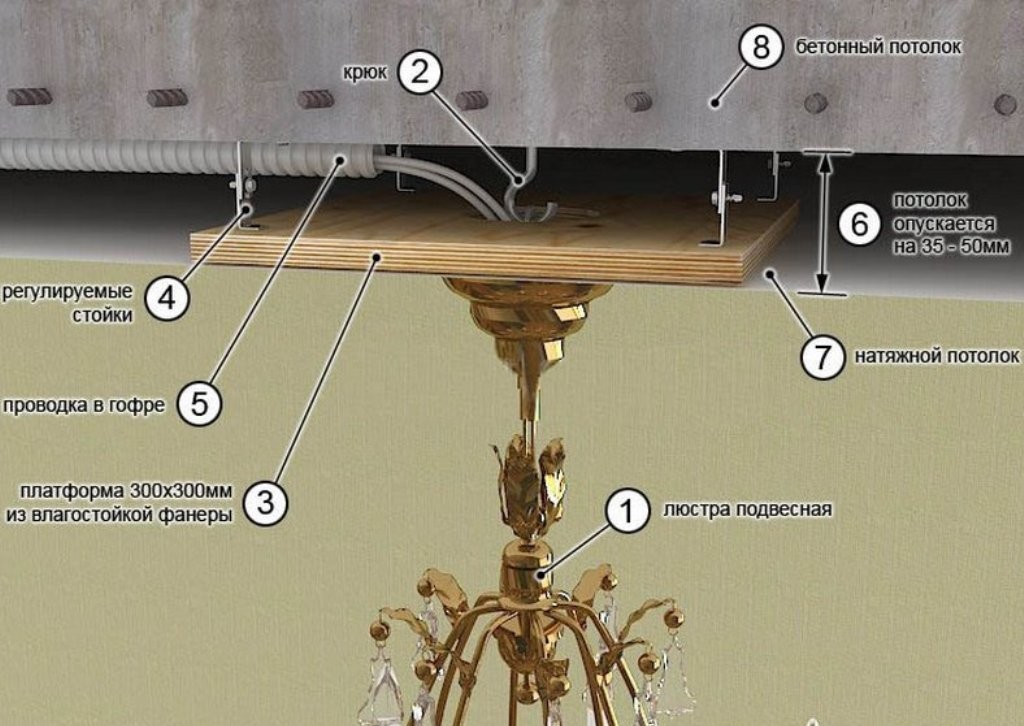
To attach a massive chandelier weighing more than 5 kilograms, it is better to use anchors. To fix the anchor in a concrete slab, it is necessary to drill a hole in it along the diameter of the anchor sleeve, insert it and turn the hook to the stop. At the same time, the end of the sleeve expands and is firmly fixed in the concrete. With a small distance between the stove and the finishing ceiling, the chandelier can be hung directly on the anchor hook, if the distance is more than 5-7 cm, it should be lengthened with a chain.

Step 3.After stretching the ceiling and its cooling, locate the hook or support bar. In the place of attaching the chandelier to the ceiling, a plastic mounting ring is glued with a diameter slightly smaller than the inside diameter of the decorative chandelier bowl. Inside the ring, the ceiling is neatly cut and the film is removed.
Step 4. Attach a hook to the bar, if it is not fastened, or level the standard hook level with a chain. Get the wiring, neatly straighten it and fasten the terminal block.
![]()
Step 5. From the chandelier remove all sharp elements that can damage the canvas, as well as light bulbs. Suspend the chandelier on the hook for a special loop and connect the wiring. Carefully lay the wires around the rod so as to avoid touching the exposed part of the hook wires and chandelier elements. Put on the decorative bowl and fix it to the desired level so as to avoid stretching the fabric.

Step 6. Screw in the bulbs and turn on the switch. Check the work of the lighting device, the accuracy of the inclusion and the absence of sparking and cod. Having disconnected the switch, put on plafonds and fix the elements of decor removed before installation. Turn on the lamp for 15-20 minutes and gently check by hand heating the ceiling near the chandelier. If the hand is hot, it is better to replace the light bulbs with less powerful ones to avoid overheating and destruction of the canvas.
This method is used when a fastening to a longitudinal or cross-shaped mounting strip is provided. The size of the platform is determined based on the size of the bar, and its thickness depends on the weight of the luminaire. Mount the bar when installing the baguettes, keeping it at the same level with the rails.
The platform is made of bar, board or piece of plywood. Also, plastic mounting rings are required for fixing the fixture. The diameter of the ring for the longitudinal bar should allow you to thread the wires inside it and fix the bar to the screws. For a cross-shaped bar, you need five rings of different diameters.


The place for installing the luminaire on the mounting platform is determined by the design project. If the chandelier is hung in place of the suspension of a standard hook, the latter is cut off or insulated inside the plate, and the hole is sealed with plaster on the basis of gypsum, after having checked and maximally pulling the wiring.
Note! When drilling a ceiling for mounting the platform, it is important not to get into the hidden wiring! To search for it, use the electronic phase indicator.
Step 1. If the ceiling level is lowered slightly, to mount the luminaire on a small longitudinal bar, it is sufficient to fix the mortgage bar in the desired place of the ceiling. Do it like this: drill in the bar two holes with a diameter of 2-3 mm. In order to lay the wires, a shallow groove is cut through the center of the bar. Mark the ceiling and drill the holes with a perforator, after which fix the bar and lay the wires in it.
For the cross-shaped mounting plate, the platform is also made of a cross-shaped, fixing it with perforated brackets.

Step 2. If there is a significant change in the ceiling level, for example, when mounting two-tier structures, use the prefabricated structure of the mounting platform. To make a platform from a piece of plywood 6-12 mm thick cut a rectangular platform of the required size. Its length should be several centimeters greater than the length of the luminaire bar, and the width - slightly larger than the diameter of the mounting ring. For the cross-shaped strip the platform is square.
In the center, drill a hole for wires with a diameter of 10-15 mm, after which the front side of the platform is thoroughly grinded, so as not to damage the ceiling liner. At the corners of the platform brackets are attached to the wood screws.
Step 3. Apply the platform to the ceiling and check its level - it must coincide with the calculated level of the final ceiling. Adjust the height of the platform using brackets, bending them. Fasten the platform to the ceiling with screws and dowels.
Step 4. Set the perimeter of the room guides, checking the compliance levels of the mounting platform and baguettes. Tension the ceiling on conventional technology. After it has cooled down and acquires the necessary elasticity, proceed to the installation of the lamp. Touch the hole for the wires and attach the mounting ring around it to the adhesive. Carefully cut the canvas inside the ring and remove the wires through it.
To fix the cross-shaped bar, it is necessary to fix five rings of different diameters on the web-one in the center for the wires and four in the fastening points of the bar, their diameter may be small, the main thing is to pull the bar to the platform.
Step 5. Mounting studs are installed and extended to the lock nut on the mounting plate. They need to be tightened properly, otherwise it will be impossible to fix the lamp. Fasten the bar with screws to the platform.

Step 6. Remove from the lamp sharp parts, light bulbs, prepare to connect the wiring terminal block. It is better to hang a chandelier together - one holds the lamp, and the second connects the wires and tightens the nakednye decorative nuts on the body of the luminaire.
Step 7. Twist the lamps, install plafonds and decorative elements on the lamp, check the work of the lamp, and also heat, as described above.
To better understand the process of fastening the chandelier, you can watch a video.
Video - Installation of a chandelier on a stretched ceiling
The installation of a chandelier on a stretch ceiling is not so difficult, if you follow all the steps of the instruction. It is important not to damage the cloth and secure the luminaire securely, as well as to properly connect it. If you do not have the skills of conducting electrical installation works, you can install the chandelier yourself, and the connection is better entrusted to a professional - on this depends not only your safety, but also the longevity of the ceiling.
("config" :( "idpartner": 29 "," siteId ": 162))