To create an effect, it's better to use dynamic pictures. Also, it is very important that the background in the background is dark. Then all the drawn lines will be well marked and contrasting, and the effect will turn out very beautiful.
The final result is shown in the screenshot below.
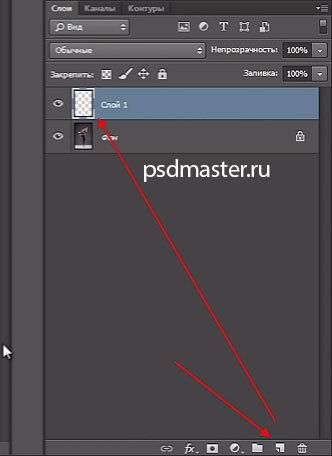
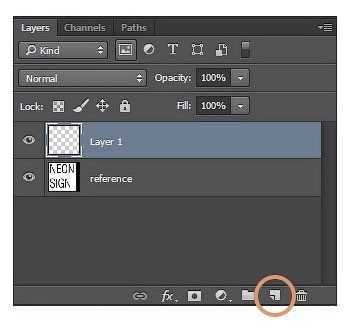
Let's get going. Open the photo and create an empty layer on top.
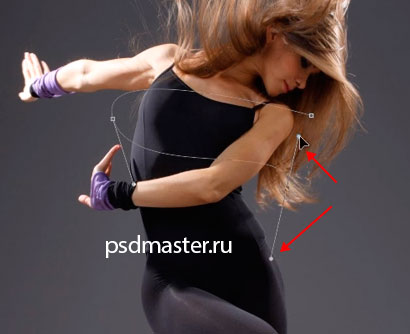
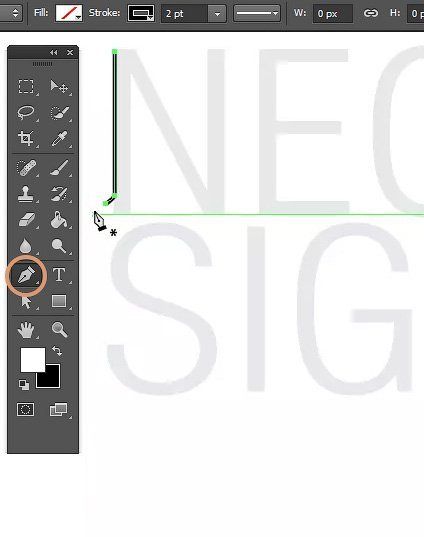
We start drawing our line. We put the first point, then the second point, and without releasing the mouse button, curve the curve as in the screenshot below.

With the Ctrl key pressed, you can drag the points as you like, and using the guides, you can change the bend angle of your curve.

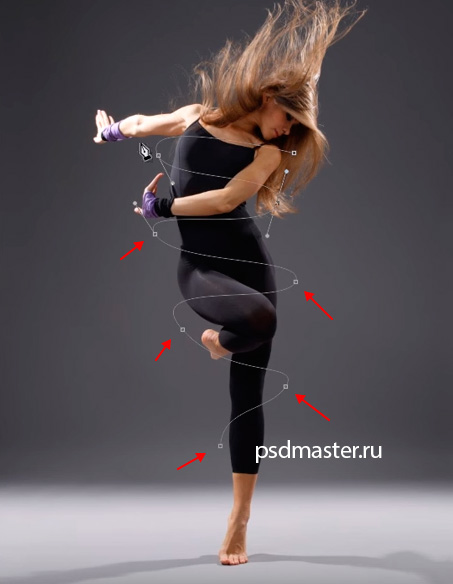
Continue to put the dots and curve the curve as in the screenshot below. You can also look at the photo from afar and, if necessary, fix and drag the guides at your own discretion.
Now we need to set up the brush in such a way as to stroke this outline. Select the brush tool and in the settings, set the "Size" to 25 pixels (it will depend on your photo) and "Hardness" to 0. "Transparency" and "Push" are left 100%.
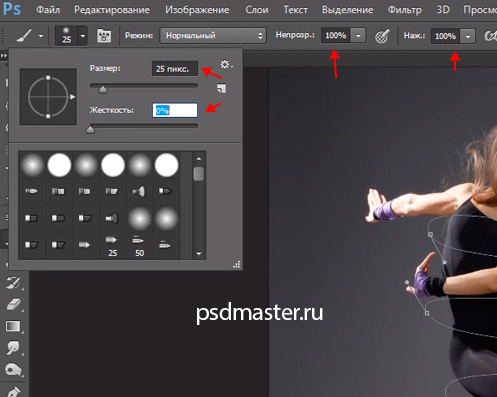

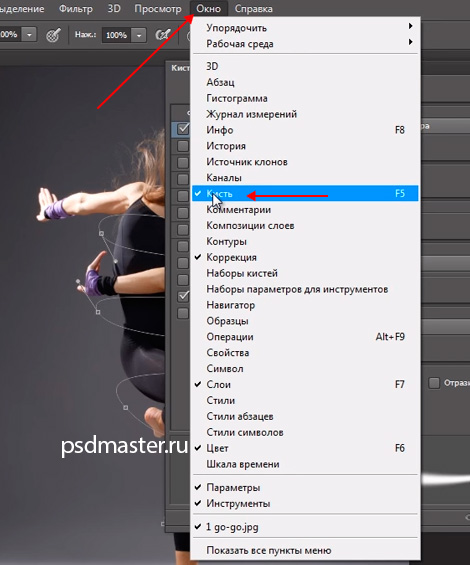
If you do not have the "Brush Settings" palette, you can turn it on through the top menu "Window -\u003e Brush" (Window -\u003e Brush). Hotkey F5.
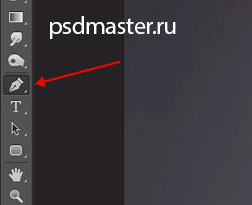
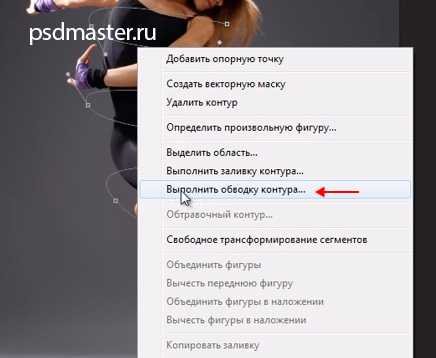
After that, go back to the Pen tool, right-click on the outline and select "Run stroke outline" from the drop-down menu.
In the settings we set "Brush" and put a tick "Simulate pressure".

The outline is outlined. In order to remove the guides, press the Esc key on the keyboard.
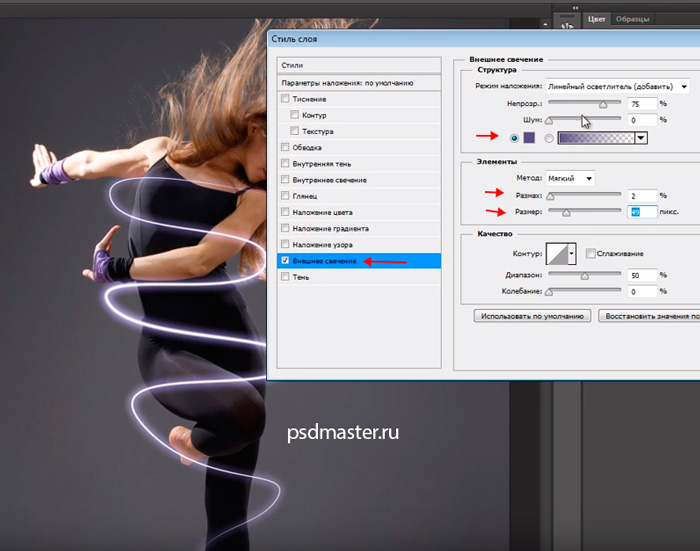
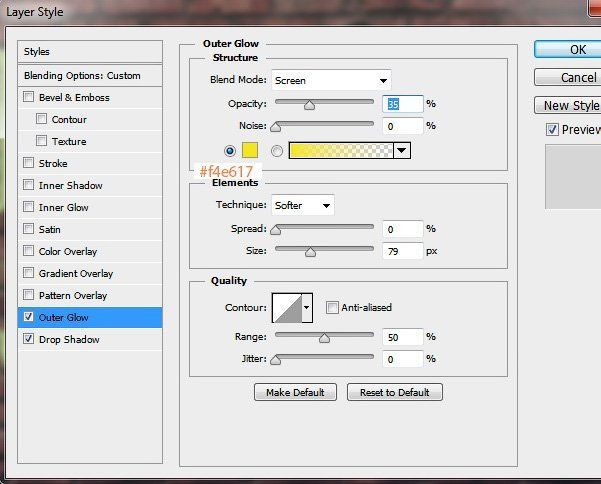
The next step is to add a glow. We double-click the left mouse button to the right of the name of the new layer to go to the "Layer Styles". Here we put a tick and go to the setting "Outer Glow" (Outer Glow). In the settings, the color for the glow is purple. It can be taken from the sleeves of the model in the photo. "Swipe" is set to 2% and "Size" is increased to about 50 pixels, so that the glow is bright. You can still reduce the transparency to 80%. All other settings should be set as in the screenshot below.
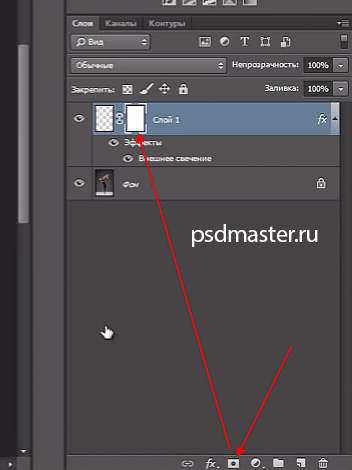
The last step is to erase the areas of the glowing spiral, which we do not need. To do this, add a mask to the layer by clicking on the corresponding icon in the layers palette.
Take the Brush tool. "Hardness" is set at 50%, the size is larger and the main one is necessarily black. We begin to gently erase those areas where the line is not needed. Trying to get the effect that the line goes around the body of our model.
![]()
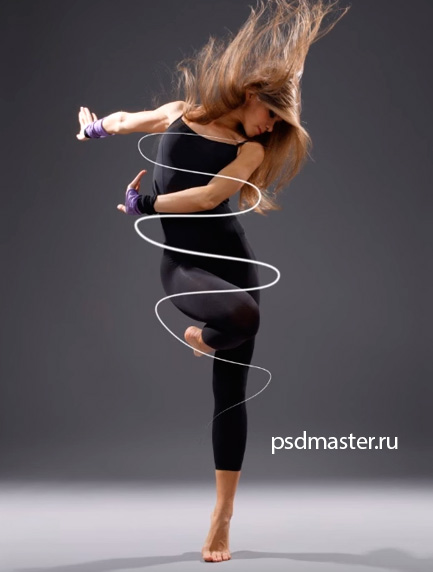
As you can see, now the line goes neatly around the model body and you and I have got such a beautiful neon glow.
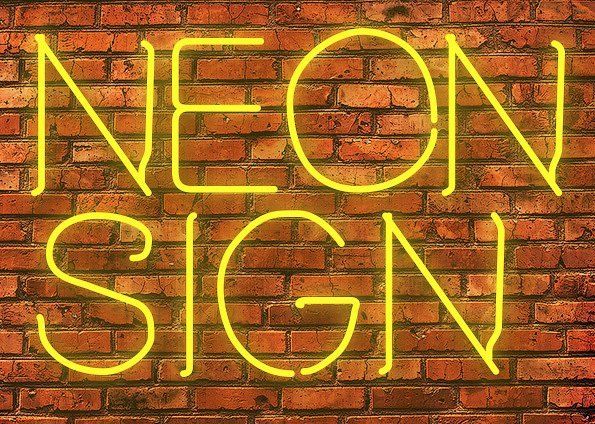
In this tutorial, we show you how to make a neon text effect, using simple overlay options and basic effects in Photoshop. Below is the final result, which we will do.
Step 1: Image of a brick wall
Find on the Internet a suitable image of a brick wall.

Step 2: Correction Hue / Saturation
Create a new document. Drag the brick wall image onto your canvas. Press CTRL + U to open the correction dialog box Hue / Saturation (Hue / Saturation). Use the following settings to darken the image.

Step 3: Clouds
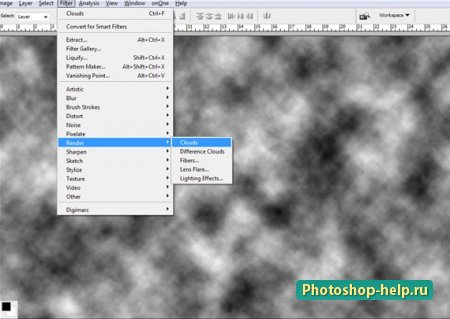
Change the foreground color to black and the background color to white. Create a new layer and go to the menu Filter\u003e Rendering\u003e Clouds (Filter\u003e Render\u003e Clouds).
Step 4: Overlap
Now select the layer with the cloud and change it Overlay mode (Blend mode) on Overlapping(Overlay). Select a tool Eraser (Eraser) and erase the clouds as shown below.

Step 5: Text
In the center of the canvas, write the desired text. Set the text color as shown below.

Step 6: Gaussian Blur
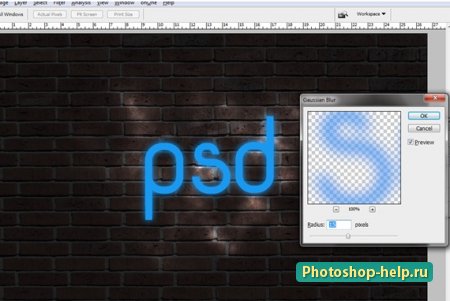
Duplicate the text layer. Go to the menu Filter\u003e Blur\u003e Gaussian Blur (Filter\u003e Blur\u003e Gaussian Blur). Specify a radius value of 15 pixels.
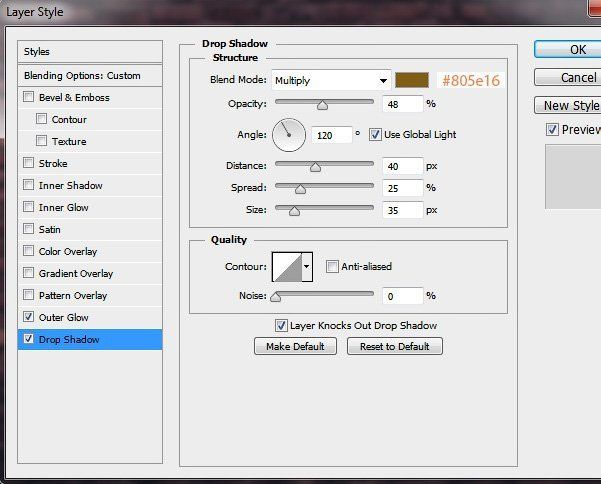
Step 7: Shadow
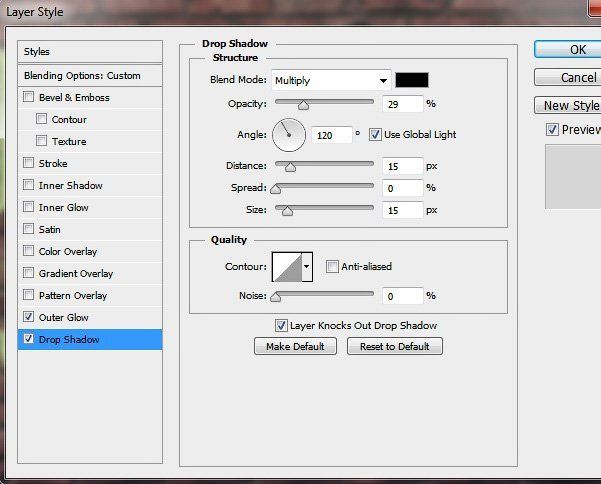
Now select the layer with the text and open its layer styles. Choose style Shadow (Drop Shadow) and use the following options.

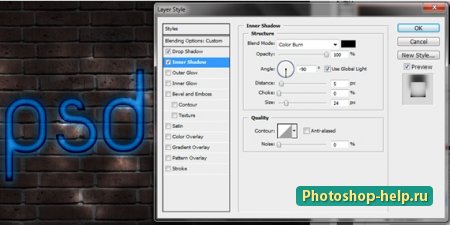
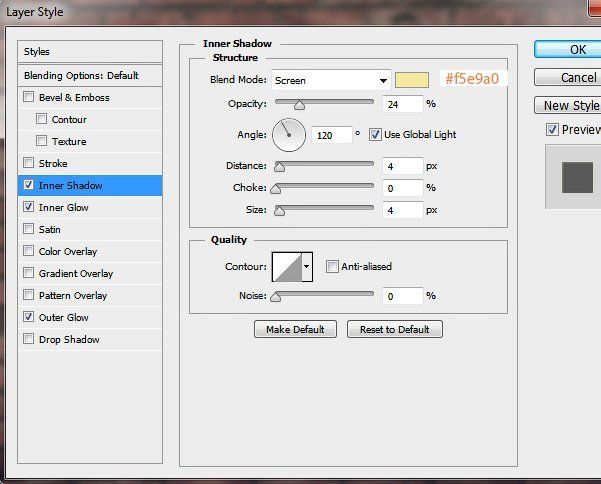
Step 8: The inner shadow
Now select a style Inner shadow (Inner Shadow) and use the following options.
Step 9: External Glow
Did you notice the neon signs scattered around the streets of the city? In this tutorial, you will learn how to create a neon effect from scratch using the basic tools of Photoshop Pen and Brush, as well as various layer styles to get a realistic result. Let's start!
1. Create letters
Step 1
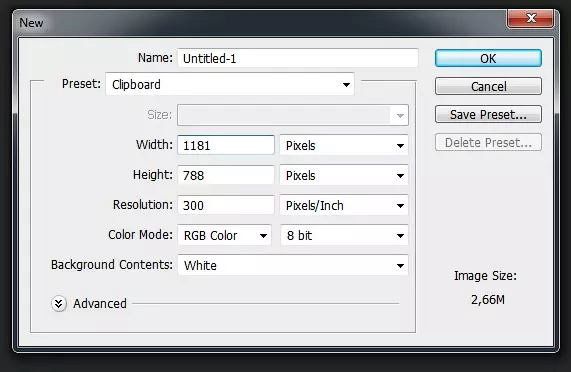
Open the program and create a new document with a size of 1181 x 788 pixels with a resolution of 300 dots / inch.
Step 2
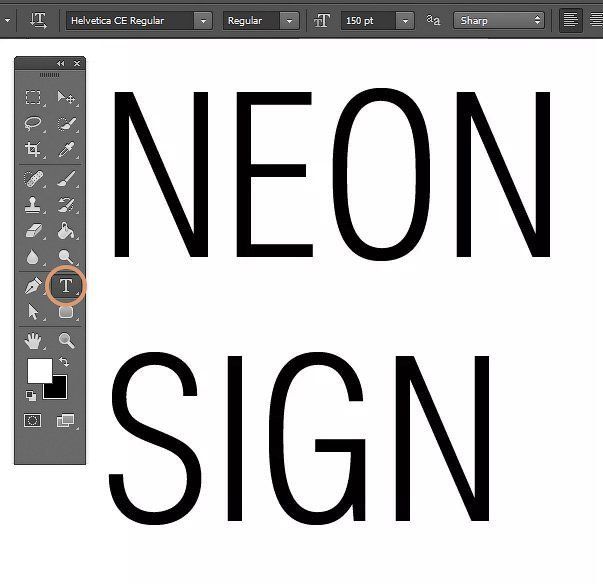
Activate Type Tool (T) (Text) and write the word or phrase in any standard font, for example, Helvetica.
Step 3
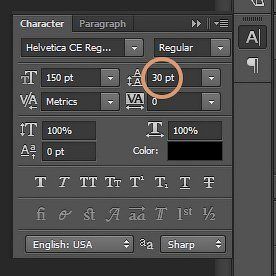
Open the window Windows - Character (Window - Symbol) and adjust the distance between lines of text (the value depends on the font size).
Step 4
Also make the text a little wider (again the value depends on the size of your text).

Step 5
Create a new layer (Ctrl + Shift + N) by clicking on the button Create a new layer (Create a new layer) at the bottom of the layers panel.
Step 6
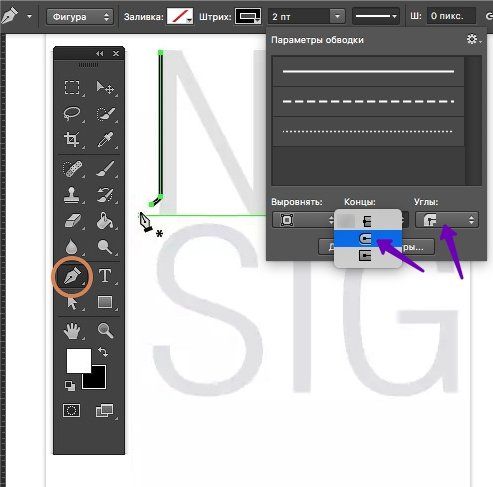
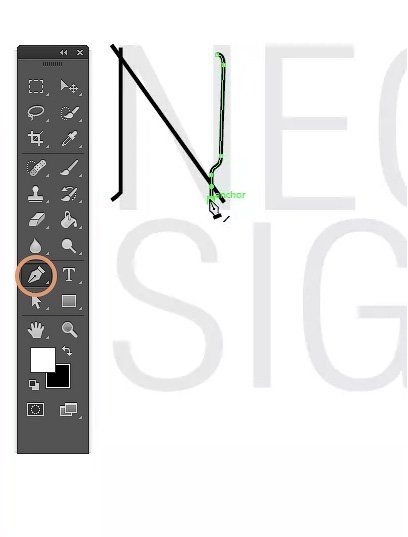
Activate Pen Tool (P) (Pen) in the mode Shape (Figure) and begin to draw on the contour of letters.
Translator's Note: Fill color with turn off, turn on the outline of the outline (the width of the stroke will depend on the size of the document). Drawing one line, be sure to press the keyEnterto complete the outline.
Step 7
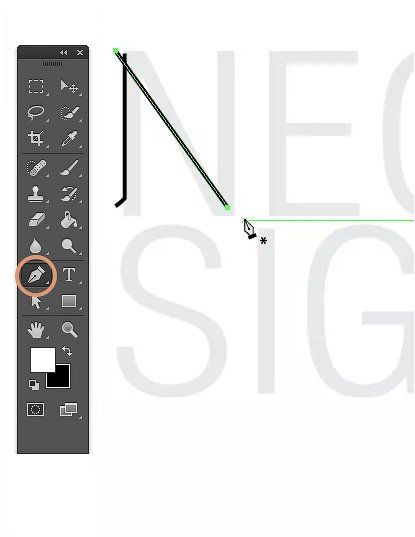
Draw the following lines.

Step 8
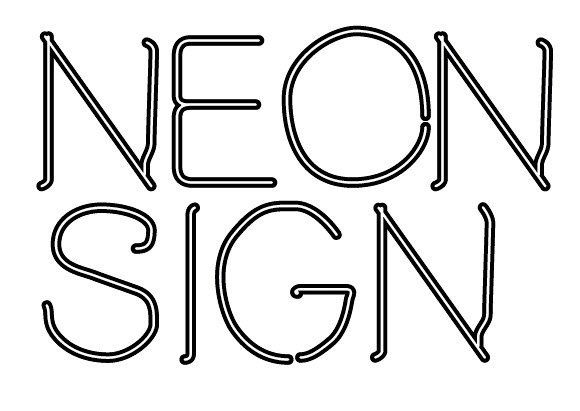
Repeat the process and draw the remaining letters. I advise you to study real neon signs to get a fairly realistic form of letters.
Step 9
Now open the photo with the wall and drag it to the working document under the layer with the letters. This will be the background for the neon text.
![]()
Step 10
Select all the layers with letters and press Ctrl + G to add them to the group, then Ctrl + E to merge the group into one layer.
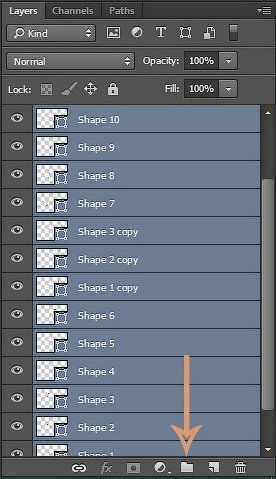
Step 11
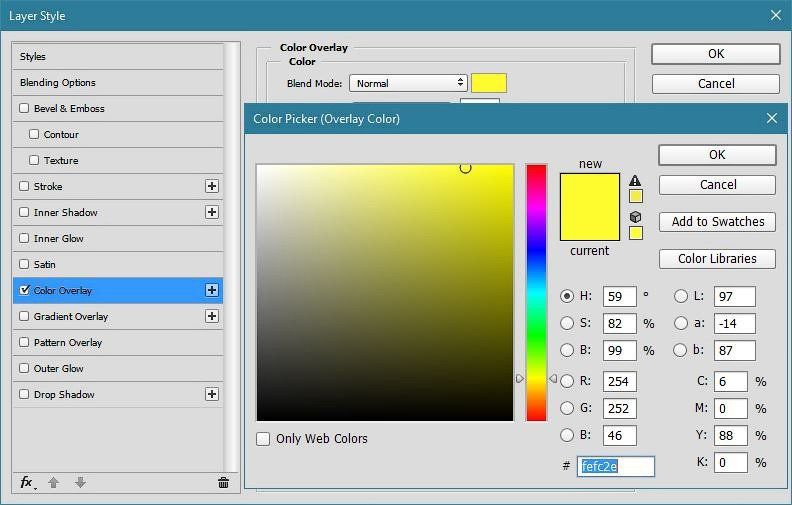
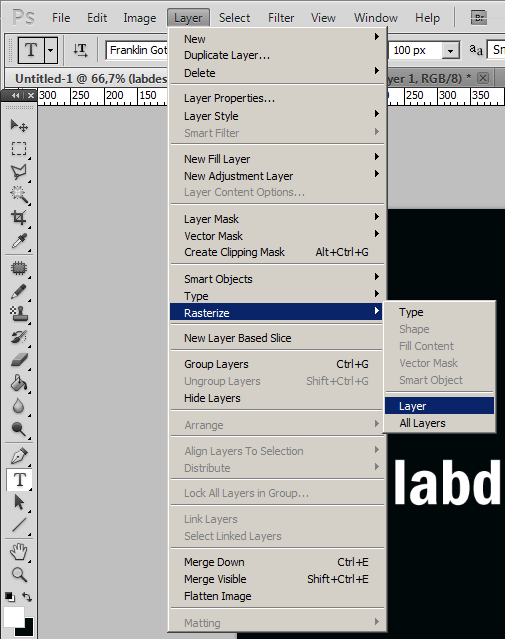
Layer Style Color Overlay (Overlapping colors) and click OK. Click on the layer with the right mouse button and select Rasterize Layer Style (Rasterize the style of the layer).
2. Adding Effects
Step 1
Double click on the layer to open the window Layer Style (Layer Style). Apply layer style Outer Glow (External glow).

Step 2
Duplicate the text layer (Ctrl + J), grab the fx icon on the layer with the left mouse button and drag it to the trash icon to clear the layer from the styles.

Step 3
Double click on the copy of the layer and apply Outer Glow (External glow) and Drop Shadow (Shadow).

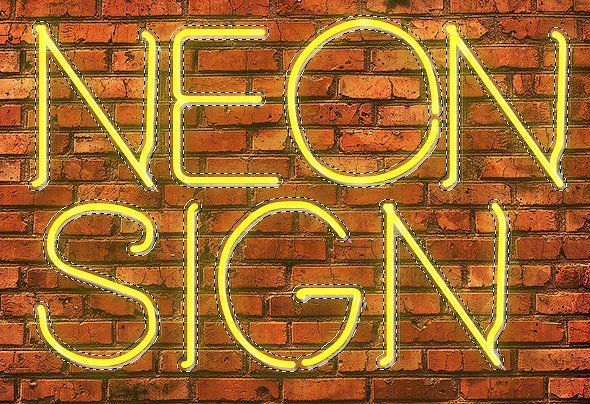
This is what the result looks like, but so far there is no real neon effect.
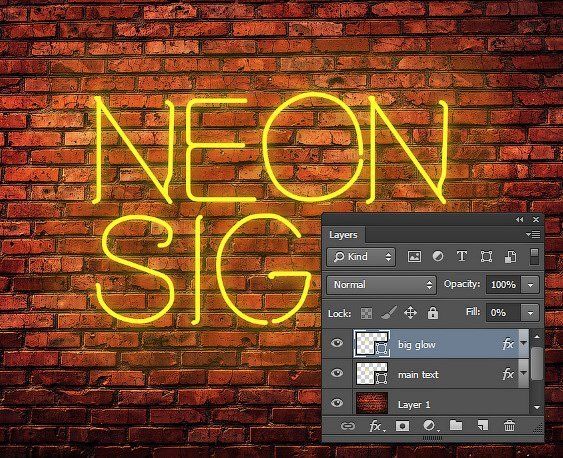
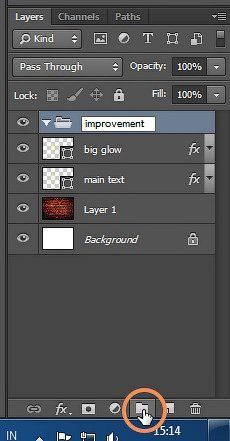
Step 4
Create a new improvement group by clicking on the icon at the bottom of the layers panel. Duplicate the second text and place a copy in this group. Double click on it and customize the layer styles. The size (Size) of the external glow and the shadow is changed to a larger one.
Step 5
Press Ctrl and click on the thumbnail of the text layer in the layers panel to load its selection. Then we pass Select - Modify - Contract (Selection - Modification - Compress) and enter a value of 1 to compress the selection by 1 pixel.

Step 6
Press the right and down arrow keys several times to move the selection just below.
Step 7
Create a new layer and fill the selection with white color. To do this, click Edit - Fill (Editing - Fill).
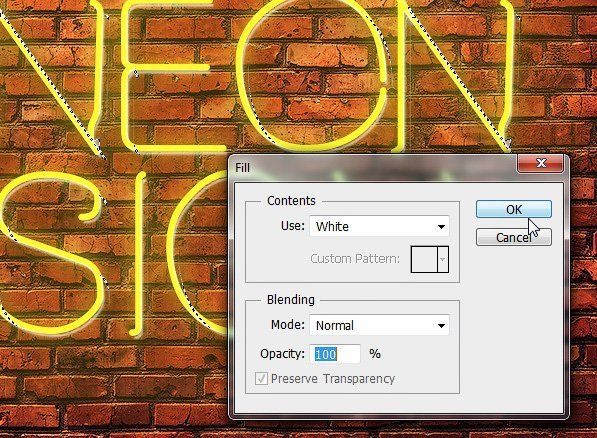

Step 8
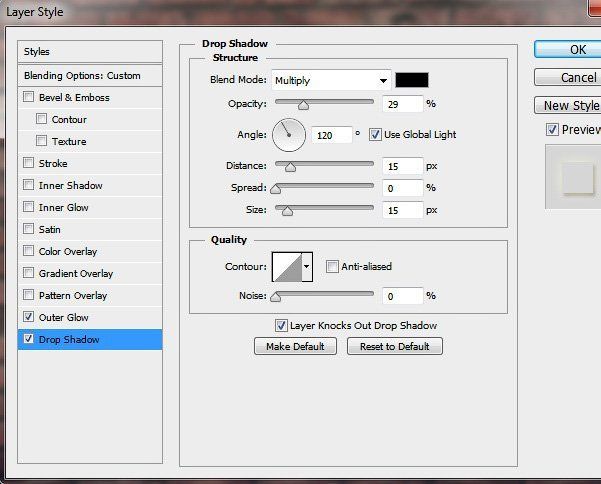
Duplicate the text layer and place it in the group. Double click on it to apply the layer styles Outer Glow (External glow) and Drop Shadow (Shadow).

Step 9
Again, hold down Ctrl and click on the thumbnail of the layer to load its selection. We pass Select - Modify - Expand (Selection - Modification - Expand) and expand the selection by 4 pixels.

Step 10
Create a new layer above the text layer and fill the selection with any color.
Step 11
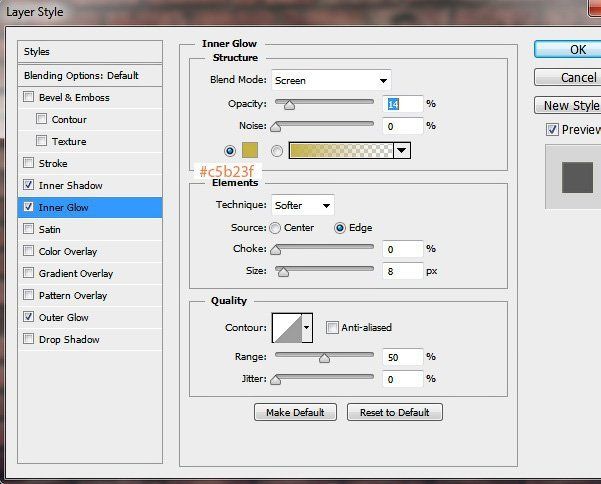
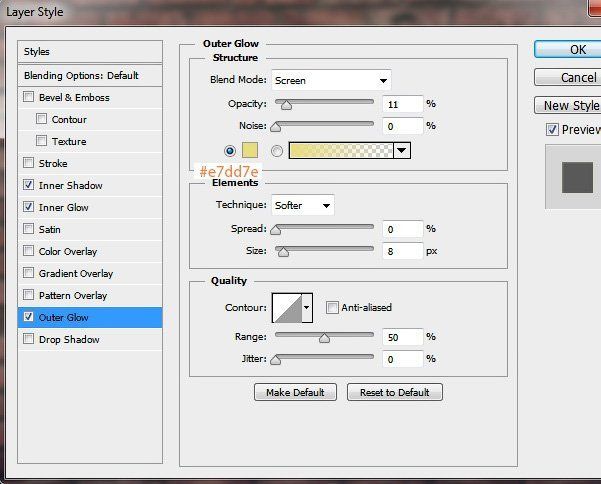
Apply to the layer styles Inner Shadow (Inner Shadow), Inner Glow (Internal glow) and Outer Glow (External glow). Then install Fill (Fill) this layer with 0%.


Step 12
Now the text is more like a neon sign, but still need to work. Now we will try to add bulk to the text. Press Ctrl and click on the thumbnail of the text layer, then compress the selection by 1 pixel.

Step 13
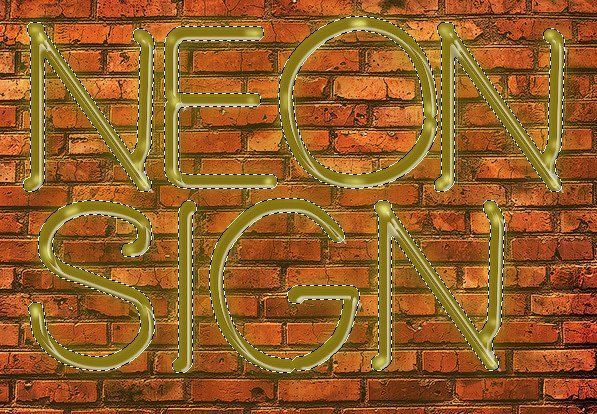
Above create a new layer and fill the selection with a dark yellow color.
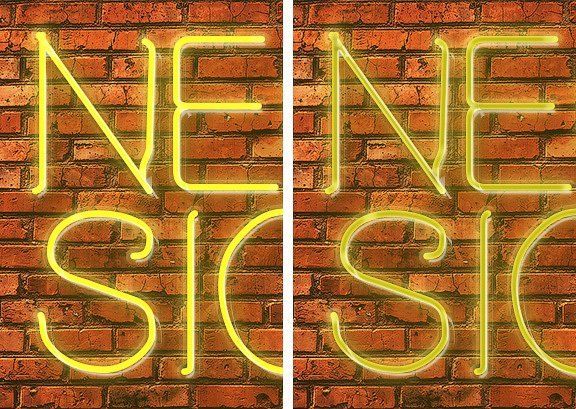
Step 14
Add a mask to the layer by clicking on the button Add layer mask (Add a layer mask) at the bottom of the layers panel. Then we draw a black brush over the mask to hide a part of the dark yellow fill.
We've already shown how Photoshop creates glow effects, neon effects and the like. However, in this lesson we will give one more example of a glowing neon text that can be obtained by applying only a few styles to several layers and slightly refining the image with filters. Well, we look ...
1 Step
Open Photoshop and create a new document. I exhibited dimensions of 1920 × 1200 pixels. Fill the background with black color.

2 Step
Import your logo and duplicate it. In order to get the desired effect, we need two layers - one will be a glow, the other - a neon light.

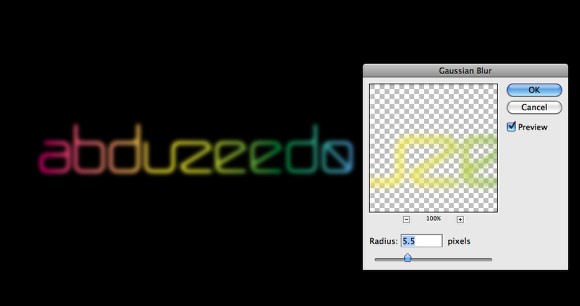
3 Step
Select one layer and call Filter\u003e Blur\u003e Gaussian Blur. Set the Radius value to 5.5px.
4 Step
For another layer of the logo, call Layer\u003e Group Layers. You will get a layer inside the folder. Change the blend mode for this folder to Color Dodge. For a layer in the folder itself, call the style menu and set it to Inner Shadow. Color select black, and blend mode for style - Multiply. Lower the Opacity to 75%, set the angle equal to 90º, Distance make equal 1px, and Size - 2px. There is another important detail - Contour should be of the Cone-Inverted type (select from the drop-down list). Then select Outer Glow: Color Dodge, Opacity - 50%, Noise - 0%, select white color. The last nuance in this step is the blur of the layer, so open Filter\u003e Blur\u003e Gaussian Blur - set 2px for the radius.

5 Step
Select all layers and duplicate them (Layer\u003e Duplicate). Then merge all duplicates into one layer (Layer\u003e Merge Layers). Now apply to it Filter\u003e Blur\u003e Gaussian Blur. Set the radius to 100px. Move the layer behind the logo - it should be in the background.

6 Step
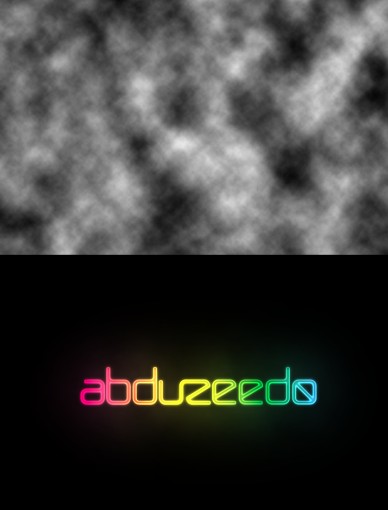
Create another one on top of the other layers and go to Filter\u003e Render\u003e Clouds. I like this filter - it always helps make the picture more natural and less straightforward. Before doing this, make sure that the main and background colors are black and white, respectively. After that, change the blending mode to Soft Light and lower the Opacity to 30%.
7 Step
Select the fog layer created in Step 3 and open Layer\u003e Layer Style\u003e Drop Shadow. Set this style to Overlay Color Burn, select Black, 25% Opacity, 90º Angle, 20px Distance and 10px Size. This style gives a shadow and gives the composition a greater depth.

Conclusion
So we learned how to create excellent glowing inscriptions from neon without much difficulty. I also hope that you understand how the menu options of the Contour menu are applied from step 4. Just by changing the outline you can get amazing results - it's a very powerful tool, at the same time much neglected by the majority. It was just an example, the rest - for you.
The name neon came to us from the Greek νέος (new) and apparently speaks of the great joy of scientists who discovered in the air inert gases. There is a legend in which it is said that the name of the new element was given by the small son of Ramsay: when he saw the strange bright red glow that matter radiated in the tube for spectral analysis, he happily exclaimed: "New! New!".
But now, it will move from the historical part to the practical one. Neon effect can be attributed to the category of the so-called Glow Effect (The effect of radiance). From our lessons on Photoshop, we already covered the themes of how Photoshop creates glow effects, this category also includes lessons on creating a rainbow effect and to establish glossy and shiny text effect . Make the effect of neon is not difficult, but it looks very nice.
Step 1
Open Photoshop and create a new document. The dimensions of the canvas are not particularly important, for example I used 800 × 600 px. Fill the background with black color.
Step 2
If you have a ready logo, then import it and duplicate the layer. One layer will shine, the second will create the effect of neon.
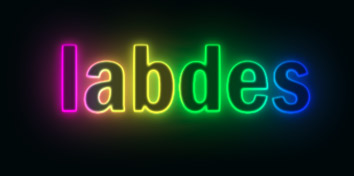
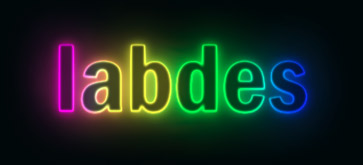
In this lesson I will create my logo. We will write the text. Rasterize the layer. Click the left button on the layer to select our text. Let's make a fill by a gradient using for example such colors: pink - yellow - green - blue. Duplicate as noted above the resulting logo (layer).


Step 3
Select the first layer (bottom) and go to Filter\u003e Blur\u003e Gaussian Blur. Use the value for Radius at 5 px.
Step 4
On the other layer of the logo (top copy), go to Layer\u003e Group Layers. Now you have a layer inside the folder. Change the Blend Mode of this folder to Color Dodge. Also inside the folder, select the layer of the logo and go to Layer\u003e Layer Style\u003e Inner Shadow. Use black color and Multiply for Blend Mode (blend mode). Change the Opacity to 75%, the angle to -90 º, Distance 1 px and Size 2 px. We will not forget a very important part: we change the contour (Contour) to Cone-Inverted. We select this value from the drop-down list.

After that, apply the effect of Outer Glow. Change the blend mode of the layer to Color Dodge, Opacity 50%, Noise 0%, white color.

The last thing we'll do at this step is to add a little blur. Go to Filter\u003e Blur\u003e Gaussian Blur. Choose 1 px for Radius.

Step 5
Select our layers of the logo and duplicate them (Layer\u003e Duplicate). Then merge the duplicated layers (Layer\u003e Merge Layers). Now just go to Filter\u003e Blur\u003e Gaussian Blur. Use approximately 20 px for Radius. This resulting layer should be below the logos.

Step 6
Add a new layer on top of all the others and go to Filter\u003e Render\u003e Clouds. This filter will help make the clouds, which in turn will give our logo more naturalness and reduce the straightness. Also make sure that you use black and white colors on the palette. After that, change the blending mode to Soft Light and lower the Opacity to 50%.
Step 7
Select the blurred layer (bottom) created in step 3, and then go to Layer\u003e Layer Style\u003e Drop Shadow. Change the blending mode to Color Burn, use black color, 50% opacity, 90º, angle, 10px for Distance and 10 px for the Size. This layer style will create a shadow and add more depth to the effect.


Conclusion
Now you can actually create a neon effect for the text. Also as an option, you can try to change the Contour, as it does in step 4. You can achieve completely different results, just by changing this parameter, this is a very powerful tool and most do not know about it.
This was another simple example of creating a luminous text effect. Try to make your own choice based on this lesson and me, so that you can do even better.
