Electricity has been and remains a valuable benefit for the daily life needs of man, his comfortable living. Electric wiring in the apartment is a source of lighting, heating, energy supplier for the operation of all household appliances. Today, the system of cable lines, like any communication, has overstated requirements, which makes it necessary to study the rules of installation and gain knowledge of the basic elements of electricians.
Modern wiring
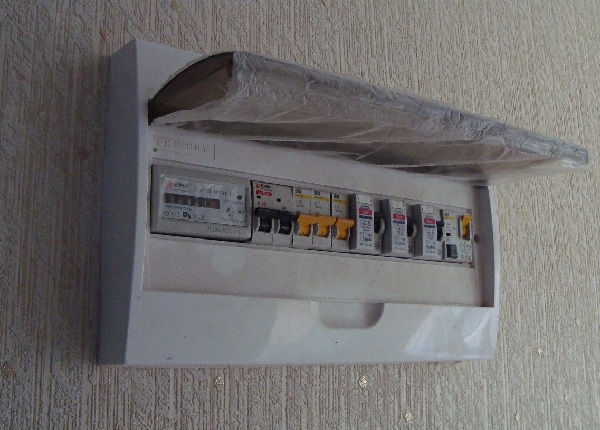
Before laying the wiring should pay attention to the type of switchboard, which must match the load of electrical appliances. Apartment electricity meters must be protected from mechanical damage and easily accessible. To do this, they must be placed in the niches of walls and in lockable cabinets.
Most often occur as a result of damage at the junction of wires. It is also necessary to pay attention to the location and number of outlets. To avoid short circuits, do not install them behind electrical equipment, try to remove as much as possible from the water ingress.
A small apartment, where one room is located, more than two outlets designed to use powerful electrical appliances, is considered a violation of safety regulations, and threatens to ignite the wiring. You can avoid this if you know exactly which section of cables is best for an electrical appliance, which meterage of wires is needed.
In order to electrical system the apartment worked long and did not need repair, it is necessary to make the correct calculation of the power of the entire wiring system in order to avoid overloading and emergency shutdown.
Therefore, when assembling the wiring diagram, switches and sockets are connected to break the phase wire, and lamps and chandeliers - to zero. Do not use appliances that do not have a technical passport.
Methods of management
During the design of the electrification project, it is necessary to take into account the architecture of the room and its area. So, for example, to create a cozy atmosphere in a one-room apartment, the amount of electricity consumed depends on the power of the ceiling and additional lamps, the number of outlets for connecting household appliances. It is important to maintain a functional and even distribution of energy sources.
 When repairing a home at an early stage, it is important for owners to coordinate with the professionals the number of expected outlets, switches, ceiling lamps. Before purchasing a wiring harness, it is necessary to accurately measure the area of the room, calculate the necessary illumination in watts per one m², and determine what section of cables the current can provide.
To obtain the total amount of electricity consumed by all electrical appliances in the apartment, you can use the table. The indicator of the calculation carried out will allow to determine what maximum power can be used in a dwelling, on the basis of this, choose the type of wiring. If the future plans to use electrical household appliances such as air conditioning, electric stove, home theater, this will help to avoid problems with wiring in the future.
Important points
When designing a wiring plan, you need to take care of the financial costs of consuming electricity. To do this, it is important to purchase light sources with maximum light output and a long service life. When choosing fuses, counters for current strength, count on the fact that all electrical appliances will work simultaneously.
When using extensions and tees to avoid short circuits or fire, it is recommended to use modern electrical devices with zero contacts and overload protection. When carrying out residential wiring requires accuracy and strict observance of the installation rules.
It is strictly forbidden to lay wires and cables in the same pipe. Do not touch them with sharp objects, you can not hang them on nails, paint, whiten. Laying of electrical wiring in the room is carried out only with the use of piercing boxes, podrozetnikov.
Using the services of professionals, adhering to the drafted project, observing all norms of fire safety, the electrification of any dwelling will be considered viable, durable, economical.
As a rule, every 3-5 years we repair rooms in our apartment. In the overwhelming majority of cases, the repair is of a cosmetic nature and includes: replacement of the ceiling, wall and floor covering, as well as the replacement of skirting boards, cornices, lighting and sockets. If you decide to make repairs in the entire apartment or move to a new one, we recommend that you replace the wiring. We will try to explain in detail how to lay the wiring correctly in this article.
The content of the article:
Why change the posting
Some people are interested in the question of why you need to change the wiring, if the old one is working fine. In order to answer this question, it is sufficient to give a similar example to water pipes. Metal pipes are often replaced by plastic pipes, because they are much more reliable and durable, and besides, they are not clogged with a grin that occurs in metal pipes, and therefore the throughput of plastic pipes and the pressure in them will always be good. The same, by and large, concerns electrical wiring.Firstly, the posting itself in the houses that were built in the last century is not designed for how we operate it now. When designing houses and apartments, electrical engineers did not know that in each apartment a few years apart from a refrigerator, a TV set, washing machine and bulbs, there will be: a computer, air conditioning, a powerful electric kettle, an iron and other electrical equipment. It turns out that the throughput of the old wiring is lower, the power consumption of all our electrical appliances.
Secondly, in addition to the mismatch of the wiring capacity, in most old buildings it was aluminum, and aluminum is not the best material for this, having a large number of shortcomings. In addition, the life of the aluminum wiring is 30 years, but it should be replaced even without waiting for this period to ensure the supply of a stable voltage in the apartment and prolong the life of electrical appliances.

Selection of wiring and installation plan for outlets and switches
Before proceeding to the description of practical steps to install wiring, a couple of words should be mentioned about the wiring itself.What new wiring is better to lay
Of course, the best cable for wiring in the apartment is a copper multicore cable. The main advantage of a copper cable in front of an aluminum cable is its strength. Probably, each of you faced such a problem, when the aluminum core of the cable, when connecting a switch or outlet, simply broke off, and this is a very unpleasant situation, with copper stranded cable such a problem is not terrible. Besides, copper cable has better bandwidth and a longer service life.To connect the sockets it is recommended to use a stranded copper cable of 2.5 squares, and for lighting - 1.5 squares. We advise you to choose a cable with double insulation. If you have a ground in your house or you plan to do it yourself in the future, then buy a triple cable, with a special dwelling for grounding.
Installation plan for sockets and switches
First of all, before the installation work, you need to think over the plan and interior of the rooms after the repair, because on its basis the wiring will be made to know where and what cable to lay, and most importantly how. Therefore, having such a plan, you will know where to put switches and sockets.For example, knowing the place where the computer will be installed, we will build a separate cable there to power all computer devices that have a high total power consumption. The same goes for other powerful techniques. In those places where the energy-intensive equipment will be located, it is better to lay a separate cable with a single outlet: an electric oven, an air-conditioner, a water heating tank, a refrigerator, a washing machine, etc. For the rest of the technology we carry out a "common" cable and sockets.
Hall
In the hall, it is recommended to install 5 outlets with one frame, for connecting a home theater (TV, DVD player, digital receiver and audio system), a double outlet near a soft corner, and a single outlet in the places where you need them.
Bedrooms
As for the bedroom, it is better to make a double outlet near the bed, desk and TV. In other places - as needed.
Corridor
In the corridor, it is sufficient to install one double outlet, and, if necessary, additional ones.
Bathroom
In the bathroom, the presence of outlets depends on what electrical appliances you use it. If there is no washing machine there, and your family members will not use electrical appliances, then you wash off the outlet in the bathroom - no.
Kitchen
If you have a technically functional kitchen, then in the place where the cutting table will be located, we recommend making from three to five outlets in one frame, depending on the number of simultaneously used appliances. As a rule, 5 outlets are the best option to connect: a hood, a microwave oven and an electric kettle, leaving two sockets free for connection: a food processor, a bread maker, a coffee maker and the like. Try to think over the number of outlets so that a stationary technique that does not fold into the box after use has its own power outlet, so that you do not have to plug a plug from one outlet to connect the other. Then calculate the necessary number of outlets, as well as how much power and how many devices will work simultaneously to know: to carry one cable or several.
Also, we make outlets in other places, where necessary.
Mounting of sockets
According to the established standards, the installation of the sockets is made at a distance of 30 cm from the floor, and the installation of switches - by 85 cm. One cable with a cross section of 2.5 squares can connect up to five outlets for powering non-power-consuming devices, preferably one. From the counter to the junction boxes it is recommended to use a cable with a section of 4 squares.
How to dismantle an old wiring
So, when you know where and what outlet you should have according to plan, we proceed to dismantle the old wiring. The procedure of dismantling entirely depends on how the old wiring was laid: laid in special channels inside the wall or walled in, but about all this in order.Before carrying out all electrical installation and dismantling work, it is necessary to disconnect all the apartment wiring coming from the meter, and from the meter, directly supply the extension cord for temporary power supply.
If the wiring was laid in channels, then its dismantling and installation of a new one is carried out simultaneously. That is, to one end of the old cable we reel up a new one, and pull out the second end of the old wiring - so you do not need to beat the walls to dismantle the old wiring and experience difficulties with laying a new one. But if the plan for the new wiring does not coincide with the plan for laying the existing one, then it will be necessary to pierce the strobes in the walls.
In the event that your apartment wiring was embedded in a wall, you first need to determine where it is laid, and only then to make its dismantling and laying a new one. Find wiring in the wall and you can visually see the wall surface sealed strobes, or using a special device.
How to correctly post wiring
The installation of the new wiring is as follows: on the wall we make a marking, where the new wiring will take place. After that, with the help of a grinder and a perforator we make the shtroby - the best way for the walls of a panel house. We advise you to lay the wire in the corrugation, as this is additional safety, and the next time its replacement will not be so difficult, since the new cable can be pulled by pulling out the old one.
When the shrouds for the cable are done, we first conduct the cable from the meter to the junction boxes. We place the cable in the corrugation and place it in these stitches, fixing to the wall with alabaster, every 1-1.5 m. Further, from the distribution boxes we lay the cable (also in the corrugation) to the outlets, switches and lighting devices. The release of the cable for the outlet and for the switch must be at least 15 cm. The next stage of work is the connection of the cable branchings to the trunk cable in the junction boxes. We would like to draw your attention to the fact that the cable is connected with a special terminal, and not with twists. Such a connection will be better and safer. When all the work in the junction boxes is made - go to the apartment input power.
The final stage of the work is to connect the house wiring to the meter. If you have an old meter and old machines - they should be replaced. The ideal option is to invite electricians to conduct a new cable from switchboard entrance to you in the meter, and also replaced the meter itself. We recommend to install the meter in a special metal flap, which also installs electric machines. With regard to automata, we recommend to install two-phase. How many amperes should be in the machine - determine based on what kind of equipment will work for you at the same time. The consumed power of these devices is added up and divided by 220, so we get the amperage of the machine. After all work with laying a new cable into the apartment, replacing the meter (sealing) and installing the machine - completed, most recently connect the machine to the apartment layout and then turn on the machine. If the machine is not knocked out - then everything is connected correctly, we check all the sockets and switches for operability.
Materials that are needed to replace the wiring in the apartment:
- Cable;
- Sockets and switches (frames);
- Boxes for sockets;
- Junction boxes;
- Gofra;
- Klemniki;
- Electric machine;
How much does it cost to change the wiring in the apartment
If you decide to replace the wiring, using the services of special firms for this, then usually one point, according to average calculations, you will cost around 500 rubles. That is, to install 2 sockets and 2 switches - this will cost 2000 rubles, not counting the materials: box, cable, outlet or switch. To this, it is necessary to add also the cost of laying the cable from the shield to the junction box and the cost of materials. Thus, the replacement wiring in a one-room apartment will cost you 7000 rubles.The cost of replacing the wiring with your own hands will be several times cheaper, because for this you only need to buy the necessary material, and also have: a grinder with a disc for concrete, a puncher with stabbing attachments, alabaster and an auxiliary tool.
Virtually every owner has to replace the electrical wiring in the apartment. In particular, if the apartment is in a house built more than 20-30 years ago. At that time, most of the currently used household appliances and electronics did not exist, so the wiring was not originally designed for such a load and was made primarily of aluminum.
Over time, the characteristics of such wiring deteriorate significantly. If you apply excessive wiring to such a wiring, it will simply not survive and burn.

Specialists strongly recommend that any electrical installation work be commissioned by professionals. However, if you want, you can perform all necessary activities on your own. It is only necessary to get acquainted with the general information about the work ahead, memorize the safety regulations and carry out installation in accordance with the instruction.

Remember: it is meaningless to perform a partial replacement of the wiring. If you decide to take such measures, then change everything completely: shield, switches, electrical outlets, etc.
First find out the layout of the old wiring. In some situations, the scheme is organized so that it is impossible to replace existing components with new ones, and the only affordable solution remains to dismantle the trunks and arrange the layout in a new way.

For example, there are situations in which the wiring is made in stitches placed under the floor covering. If the owner's plans do not include a complete replacement of the coating, the only possible option in this situation is to disconnect the old wires and lay new trunks in a different way.

If the cables are initially laid in the stitches, there will not be any problems with the replacement, but the wall covering will suffer significantly.
The easiest way is to replace the wiring laid in an open circuit. With this scheme, the cables are laid in special channels (boxes). If the original boxes were not masked by the finish, for example, plasterboard, then the repair work will be done with the least loss.

Before you start, you will need to create a new wiring layout. Choose the method for arranging the posting. From the open method it is strongly recommended to refuse - in an apartment this is simply not aesthetically pleasing. Prefer either closed installation or wiring in cable ducts.
Sketch on the paper a plan of housing with indication of the locations of switches, sockets and other components.

It is more convenient if the sockets will be placed in places of installation of powerful home appliances. Calculate the optimum number of outlets. It is more convenient when there is one outlet for every 5-6 m 2 of space. In the kitchen at 6 m 2 there must be at least three sockets.

In the case of installing an electric stove in the apartment, it is necessary to mount a separate outlet for it. In this case, the power cable of such an outlet must have a cross-section of at least 4 mm 2, or even all 6 mm 2. The specific value is selected individually according to the power of the equipment.

Strict requirements regarding the height of placement of outlets are not present. The main thing is that they are convenient to use.
It is most convenient to install switches immediately after entering the room. The optimum distance between the switch and the door is at least 150 mm. Place the switch on the side of the porch. Near the loops, they will not be very convenient to use. Strict recommendations regarding the height of the installation of switches also do not - do as you please.

Preliminary determine the total power of electrical appliances for each individual room. If a large number of powerful devices are installed within a single room, separate lines with individual automatic machines protective shutdown.
In accordance with the selected places of installation of switches and sockets, select convenient areas for the installation of junction boxes. Specify the location of their placement in the plan.

Specify in the plan the type, material of manufacture and cross-section of cables for each room.
Check the wiring diagram again. Think about whether everything suits you, whether it will be convenient for you to use in future rosettes and switches mounted in such a scheme. If the result suits you, perform basic preparatory activities.
First of all, put on the walls of the location of the switches and electrical outlets. If the wiring is done by a hidden method, get rid of all the finishing materials, and then draw on the walls the lines of passage of wires and the place of installation of the elements of the new system.
If you want, you can get rid of the old wiring. First get rid of the switches and sockets, after - from the distribution boxes and cables. But this is quite a dusty and protracted work. It is much easier to simply disconnect the old wires, dismantle the switches and sockets, seal up the installation sites and lay new cables in accordance with the diagram.

Safety precautions
All work on the dismantling and installation of electrical cables must be carried out in strict accordance with safety regulations. Before performing any manipulations, disconnect the main machine, ie, disconnect the apartment.

![]()
Using the indicator, make sure that there is no voltage in the chandeliers, electrical outlets, switches. Do all this with rubber gloves. The handles of the working tool must be insulated.

The replacement of the wiring should begin with the installation of a new switchboard. In new homes there are usually niches for such shields with a pre-installed power cable. In such a situation, it remains only to place the protective shutdown devices and automatic devices in the switchboard, fix the device in the intended niche and connect the power cable to it.

In houses of the old construction, the shields are made hinged. Choose a place to install the panel with free access. Fix the flap on the wall with dowels.
Drill a suitable hole in the wall to connect the power cable. Pull the wire and connect it to the guard on the access platform.

Strip the lead-in wire and make the following connection:
- blue cable - to zero;
- white wire - on the upper contact;
- a yellow cable to the ground.
In the case of emergency shutdown devices, first connect the wires of the zero and the phase to this device and only then bring them to the machine and to the zero terminal.
Proceed to the installation of the wiring. We offer you two methods. Read the order of execution of each of them and get to work.
Hidden installation of new wiring
The laying of concealed wiring is carried out in stitches, under the finish of the floor, in the voids of the floors, under the layer of plaster or behind the plasterboard finish.
Arrangement of wiring under the plaster layer and in the strobes is the most "dirty" and labor-intensive option. Some owners perform cable laying on the floor. This allows you not to circumvent the existing walls, but requires a complete dismantling of the coating and laying a new material instead.
First step

Make Strokes. For their arrangement use a shtroborez or at least a Bulgarian and a puncher. Remember safety - always wear protective goggles and a respirator.

When choosing the depth of the shroud, remember: the thickness of the plaster layer laid over them should not be more than 1 cm. There are no width restrictions.
If there is a possibility of laying wires in the voids of the floors, give preference to this method.
Second step

Third step

To do this, cut the cables into pieces of the required length. In some situations corrugation may be used for greater convenience. With its help in the future it will be easier to replace the cable section without disrupting the integrity of the wall finishing material.
Also sometimes the method is used, according to which the bundle of cables is tightened by means of special clamps and attached to the wall using suitable fasteners.
The fourth step
Connect the cables in the junction boxes. To do this, use the CV. Close the connected cables with a cover.

Fifth step
Install switches and electrical outlets in selected locations. Connect the cables to the pins. Make sure the system is working properly with a special tester.

In conclusion, you will need to turn on the electricity supply from the power shield and seal the strobes with plaster.
If the method of installing the wiring under gypsum plasterboard is chosen, the technology of performing the work will be somewhat different. In this situation, the wires are always hidden in the corrugations, and the corrugations are attached to the walls using clips.

This technique is much simpler and less dusty than the previous method, but its aesthetics leaves much to be desired. The shield connection is carried out in the same sequence.
First step
Fix the skirting board to the floor surface in accordance with the pre-made scheme.

Second step
Pass the distribution boxes from the skirting to the switches and electrical outlets.

Third step
Put the cables in the box.
The fourth step
Install external junction boxes if necessary, to perform their installation. To connect the wires inside such boxes, use the CV.
Fifth step
Install sockets and switches, wind the wire, connect.

In the end, it remains to check the voltage with a tester and close the boxes with skirting boards.
It is also advisable to invite a qualified electrician to check the correctness of the activities.

Successful work!